(!)Due to Microsoft's end of support for Internet Explorer 11 on 15/06/2022, this site does not support the recommended environment.
Instead, please kindly use other browsers like Google Chrome, Microsoft Edge or Mozilla Firefox.

ideanote
inCAD Library

Please read before use

What is inCAD Library?

  • Helpful application examples for mechanical engineers.

The Concept of inCAD Library

  • Online application library with a range of ideas for all manufacturing industries.
  • Save design time and learn new design applications when you are concepting new machines.

Disclaimer

  • MISUMI may not offer all parts in each application design. Available parts can only be purchased separately not as a unit shown in each application design.
  • MISUMI does not guarantee quality, accuracy, functionality, safety or reliability for the combination of the parts in each application example. Accept these points prior to use.
  • 2014 Copyright MISUMI
  • The data cannot be used for any purposes (including sales promotion) except for designing your machine.
  • All associated CAD is free. Misumi reserves the right at its sole discretion to cancel, terminate or modify this offer.
  • MISUMI may change, add or delete application examples posted without prior notice.
  • MISUMI assumes no responsibilities for any damage incurred resulting from your use of the Service or any change, addition or deletion by MISUMI of the application examples for any reason whatsoever.

inCAD Library Features

  1. Get great new design ideas for these application examples.
  2. Over 300 design application ideas
    collected from dozens of industries!

  3. Find application examples quickly! Search by function, workpiece shape, etc.

  4. Download the CAD models for each application example.
  5. Log in to download free CAD models.
    Download CAD for the entire application example!

Good IDEA! button

Click the Good IDEA! Button when you like an application example!

*Can only be clicked once per application example.

  • Upper right corner on the page of application example details

  • Pop-up dialog for CAD data downloading

Page top

Keyword Search
No. Search

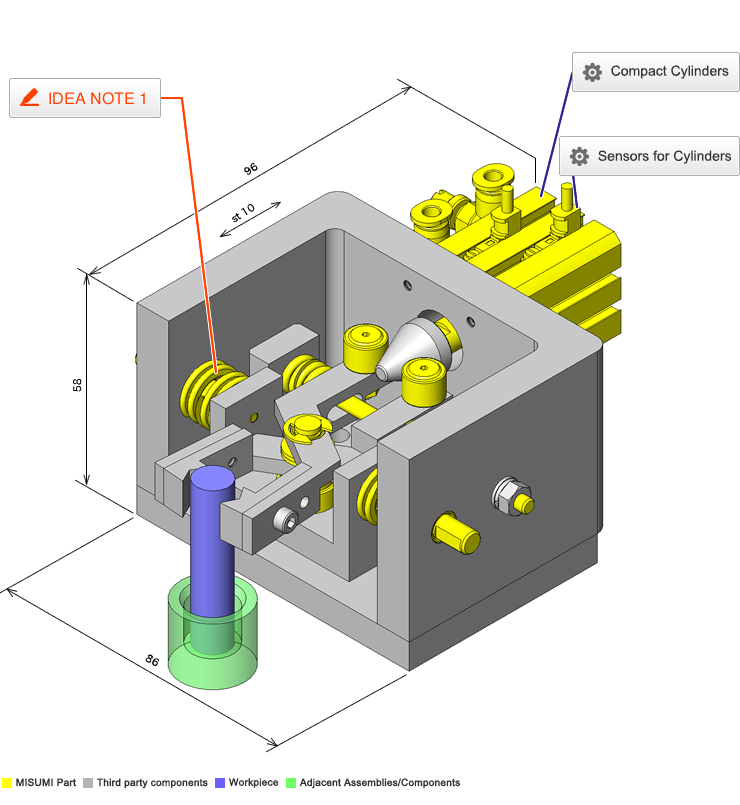
No.000115 Chuck Mechanism

Chuck mechanism capable of correcting positional displacement.

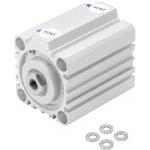
Compact Cylinders

Product name Compact Cylinders
Part number MSCCN16-10
* Orange colored cells in the table below indicate the part numbers used in this example.

Selection criteria

Used to switch between chucking and retracting.

Back to page top.

Available sizes

■Compact Cylinders

Tube I.D. External
Size
Rod Tip Screw Stroke St Body Length
(+ St shown below) Rod
Rod
Tip
Length
Screw Type DIA.-Pitch
5 10 15 20 25 30 35 40 45 50 75 100
φ12 □25 Tapped M3×0.5 22 3.5
φ16 □29 M4×0.7
φ20 □36 M5×0.8 29.5 4.5
φ25 □40 M6×1.0 32.5 5
φ32 □45 M8×1.25 33 7
φ40 □52 39.5
φ50 □64 M10×1.5 40.5 8
φ63 □77 46
φ12 □25 Threaded M5×0.8 22 14
φ16 □29 M6×1.0 15.5
φ20 □36 M8×1.25 29.5 18.5
φ25 □40 M10×1.25 32.5 22.5
φ32 □45 M14×1.5 33 28.5
φ40 □52 39.5
φ50 □64 M18×1.5 40.5 33.5
φ63 □77 46

* Sensors are sold separately.

Back to page top.

Selection Steps

■Selection procedure of compact cylinders (See "Technical Information" shown below for details.).

1.Define various conditions of the load.

2.Calculate the cylinder output. (in case of double-acting type).

3.Determine the tube I.D.

4.Determine the theoretical reference speed.

5.Verify the cylinder's cushion mechanism.

6.Verify the lateral load applicable to the cylinder.

Back to page top.

Performance info.

■Load Information of Compact Cylinders.
Min. Operating Pressure: 0.1 MPa.
Max. Operating Pressure: 1.0 MPa.

Theoretical Output (N) :

Tube I.D. Operating
Direction
Operating Pressure (MPa)
0.4 0.5
φ12 Outstroke 45 57
Instroke 34 42
φ16 Outstroke 80 101
Instroke 60 75
φ20 Outstroke 126 157
Instroke 94 118
φ25 Outstroke 196 245
Instroke 151 189
φ32 Outstroke 322 402
Instroke 241 302
φ40 Outstroke 503 628
Instroke 422 528
φ50 Outstroke 785 982
Instroke 660 825
φ63 Outstroke 1247 1559
Instroke 1121 1402

Back to page top.

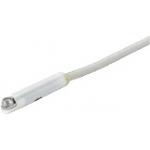
Sensors for Cylinders

Product name Sensors - For Cylinders, Grippers
Part number ME33L1
Features Sensors dedicated for Double Acting Cylinder
* Orange colored cells in the table below indicate the part numbers used in this example.

Selection criteria

Detect chuck position.

Back to page top.

Available sizes

■Sensors - For Cylinders, Grippers

Load Voltage Load Current Sensor
Type
Line Wire Exit Lead wire
Length
DC24V
AC110V
DC24V 5〜40mA
AC110V  5〜20mA
Contact Point 2-Line Rear 1m

3m
28VDC or Less 0.1〜40mA No Contact 3-Line
DC10〜28V 5〜20mA No Contact 2-Line
28VDC or Less 0.1〜40mA No Contact 3-Line Top
DC10〜28V 5〜20mA No Contact 2-Line

* Please see the product pages for detailed specifications.

Back to page top

Performance info.

■Load Information of Sensors for Cylinders.

Insulation Resistance 100 MΩ or more with 500 VDC (between case and cable)
Withstanding Voltage 1 min. with 1500 VAC (between case and cable)
Impact Resistance 294m/s²
Vibration Resistance Lateral Amplitude 1.5 mm, 10 - 55 Hz (one sweep / min, two hours in X, Y, and Z directions respectively)
Ambient Temperature 0 - +60°C (Non-Freezing)
Protection IP67 (IEC Standard), JIS0920 (Water Resistant Type)

Back to page top.

IDEA NOTE Chuck arm follows the workpiece position.

Springs are added to the chucking part so that fine displacement can be corrected.

  • TERMS AND CONDITIONS FOR USE OF CAD DATA
    Your access to the CAD data that MISUMI Corporation (hereinafter referred to as the Company) posts on this site (including 3D CAD data, intermediate 3D CAD data and 2D CAD data; hereinafter referred to as the Data) are of products manufactured and/or sold by the Company (hereinafter referred to as the Products) assumes that you have read and accepted these terms and conditions which govern your use of the Data. If you do not agree to these terms and conditions, you must stop using this website and the Data. You must not use the Data for any unlawful purpose or in any manner inconsistent with these terms and conditions.
    1. CAD Data
    The Data is prepared for assisting the Company's users in the CAD design process by providing dimensions and other Product information. In order to provide the best speed and stability working within this site, the Product drawings were simplified to reduce the size of the Data. For instance, some of the Products are shown without the oil groove shape, screws or spring shape. Also, please be aware that the tolerance, surface roughness and/or chamfer of the Data may vary from the actual Products.
    2. Disclaimer on Data
    While the Company has carefully prepared the Data, accuracy of the Data is not guaranteed and is subject to the variances as described above. The Company may also modify, add or delete the Data at any time without prior notice. The Company assumes no liability for any direct, indirect, consequential or special damages that you may claim resulted from your use of the Data or any changes to or deletions of the Data regardless of the reason. The Company provides no warranty as to the quality, accuracy, functionality, safety or reliability of the combination of Products and parts. Example applications and combinations of the Products are provided for illustrative purposes only.
    3. Copyright
    Copyrights to the content and the Data belong to the Company or the manufacturers of the Products. The said copyright is protected by the Copyright Act and international treaties. The use (including duplication, modification, uploading, posting, transmission, distribution, licensing, sales and publishing) of the Data except for the purpose to use the Data described above without prior approval of the Company is not allowed. The Data cannot be used for any purposes (including sales promotion) except for designing your machine. If you violate this provision or the laws or regulations, the Company may prohibit you from the use of the Data, the Company’s site and/or take legal action. So long as you comply with these terms and conditions, the Company grants to you a non-exclusive, non-transferable, revocable license to access and use the Data for the sole purpose of assisting you in designing machines that incorporate products.
    In case that the CAD data is found to have been to be used for any purpose other than mentioned above or against the related laws, MISUMI may take legal actions, including the one for blocking the involved user from using CAD data and from accessing to the MISUMI site.
    4. Disclaimer of Warranty
    ANY AND ALL CONTENT APPEARING ON THIS WEB SITE IS PROVIDED FOR INFORMATIONAL PURPOSES ONLY. THIS WEB SITE, ITS CONTENT AND ITS LINKS ARE PROVIDED ON AN "AS IS" AND "AS AVAILABLE" BASIS AND ARE USED ONLY AT YOUR SOLE RISK, TO THE FULLEST EXTENT PERMISSIBLE BY LAW. THE COMPANY DISCLAIMS ALL WARRANTIES, EXPRESS OR IMPLIED, OF ANY KIND, REGARDING THIS WEB SITE (INCLUDING ITS CONTENT, HARDWARE, SOFTWARE AND LINKS), INCLUDING AS TO FITNESS FOR A PARTICULAR PURPOSE, MERCHANTABILITY, TITLE, NON INFRINGEMENT, RESULTS, ACCURACY, COMPLETENESS, ACCESSIBILITY, COMPATIBILITY, SECURITY AND FREEDOM FROM COMPUTER VIRUS. THE COMPANY WILL NOT BE LIABLE FOR ANY DAMAGES OR LOSSES, INCLUDING DIRECT, INDIRECT, CONSEQUENTIAL, SPECIAL, INCIDENTAL OR PUNITIVE DAMAGES AND/OR LOST PROFITS, IN CONNECTION WITH USE OF THE INTERNET, THIS WEB SITE, ITS CONTENT OR ITS LINKS
    Further, the Company will not be liable to you for any failure or delay by the Company to provide access to the Data or any of its obligations under these terms and conditions where such failure or delay is the direct or indirect result of any circumstances beyond the Company's reasonable control (and the Company's obligations will be suspended for the duration of such circumstances).

    CAD Download (Unit Assembly)

    CAD Download: File Format
    生成

    Thank you for downloading the data.

    Click the Good IDEA! button when you find interesting design tips.


    This data is utilized in order to list more useful application examples in the future.

    CAD Data Limitations

    1. Assembly data shows the assembly drawings in the concept design phase. The sole purpose of the data is to explain the structure and functionality of the assembly and is not considered nor to be used as a final design.
      You will need to edit the Data so that it meets your specific design conditions.
    2. Unit assembly Data consists of some sub-assemblies.
      It is configured so that each sub-assembly unit can be used as it is or edited.
    3. * The part in the frame is a sub-assembly unit.

    4. The Data for fabricated parts is based on easy-to-edit dimensions and shapes in sketches and histories.
    5. The Data including the third-part components are made by the Company.

    Page top

  • * Unit assembly Data consists of some sub-assemblies.
       It is configured so that each sub-assembly unit can be used as it is or edited.

Application Overview

Purpose

  • Chuck workpieces while correcting fine displacement.
  • Springs are used to generate the necessary holding force. The claws of the chuck are adjustable to account for positional displacement.

Points for use

  • Low precision workpiece chucking.

Target workpiece

  • Shape: resin pin.
     size φ10 × 45mm.
     weight: 0.1kg.

Design Specifications

Operating Conditions or Design Requirements

  • Assumed workpiece displacement amount: ±1.5mm.
  • Spring gripping force: 23.1 to 54.6N.
  • Outer dimensions: W86 x D117.5 x H58mm.

Selection Criteria for Main Components

  • Springs that produce a gripping force of 2kg during chucking are selected.

Design Evaluation

Verification of main components

  • Spring gripping force is verified below.
  • Confirmation of gripping force of chucks.
    • Conditional value: spring constant k = 10.5N/mm.
      Spring free length: L0 = 15mm.
      Minimum spring length caused by maximum displacement amount 1.5mm: L1 = 9.8mm.
      Spring length when displacement amount is 0mm: L2 = 11.4mm.
      Maximum spring length caused by maximum displacement amount 1.5 mm: L3 = 12.8mm.
    • Maximum spring deflection amount caused by maximum displacement amount 1.5mm: X1 = L0 - L1 = 5.2mm.
      Spring deflection amount when displacement amount is 0mm: X2 = 3.6mm.
      Minimum spring deflection amount caused by maximum displacement amount 1.5mm: X3 = L0 - L3 = 2.2mm.
    • Maximum chuck gripping force: F1 = k x X1 = 10.5 x 5.2 = 54.6N.
      Chuck gripping force when there is no workpiece displacement: F2 = k x X2 = 10.5 x 3.6 = 37.8N.
      Minimum chuck gripping force: F3 = k x X3 = 10.5 x 2.2 = 23.1N.

Other Design Consideration

  • The cam shape applies load to the spring during chucking and completely opens the claws from the work piece during un-chucking.

Explore Similar Application Examples

Page - / -

Part List

No. Part Name Sample Picture MISUMI Part Number
(click the Part Number below for details)
Quantity
1 Oil Free Bushings MSCCN16-10 1
2 Extra Thin Resin Washers SSFAS6-30-F5-B3-P3-SC21 2
3 Extra Thin Resin Washers MDZB6-10 2
4 Cam Followers SWF12-15 2
5 Threaded Rods SFXBA6A-7-F11-SET 1
6 Coil Spring MDZB6-4 2
7 Flow Rate Control Valves SWSPS12-8-1.0 2
8 Sensors for Air Cylinders SWSPS12-6-1.0 1
9 Linear Guides CFFAS3-10 2
10 Brackets For Air Cylinders FWBS4-102-E10-F10 1
11 Air Cylinders SWL8-15 2
12 Floating Joints MNSPS4-M5 2
13 Floating Joints ME33L1 2
  • The part list above only contains MISUMI parts.
    Part list download (CSV) includes MISUMI and third party components used in this example.
  • TERMS AND CONDITIONS FOR USE OF CAD DATA
    Your access to the CAD data that MISUMI Corporation (hereinafter referred to as the Company) posts on this site (including 3D CAD data, intermediate 3D CAD data and 2D CAD data; hereinafter referred to as the Data) are of products manufactured and/or sold by the Company (hereinafter referred to as the Products) assumes that you have read and accepted these terms and conditions which govern your use of the Data. If you do not agree to these terms and conditions, you must stop using this website and the Data. You must not use the Data for any unlawful purpose or in any manner inconsistent with these terms and conditions.
    1. CAD Data
    The Data is prepared for assisting the Company's users in the CAD design process by providing dimensions and other Product information. In order to provide the best speed and stability working within this site, the Product drawings were simplified to reduce the size of the Data. For instance, some of the Products are shown without the oil groove shape, screws or spring shape. Also, please be aware that the tolerance, surface roughness and/or chamfer of the Data may vary from the actual Products.
    2. Disclaimer on Data
    While the Company has carefully prepared the Data, accuracy of the Data is not guaranteed and is subject to the variances as described above. The Company may also modify, add or delete the Data at any time without prior notice. The Company assumes no liability for any direct, indirect, consequential or special damages that you may claim resulted from your use of the Data or any changes to or deletions of the Data regardless of the reason. The Company provides no warranty as to the quality, accuracy, functionality, safety or reliability of the combination of Products and parts. Example applications and combinations of the Products are provided for illustrative purposes only.
    3. Copyright
    Copyrights to the content and the Data belong to the Company or the manufacturers of the Products. The said copyright is protected by the Copyright Act and international treaties. The use (including duplication, modification, uploading, posting, transmission, distribution, licensing, sales and publishing) of the Data except for the purpose to use the Data described above without prior approval of the Company is not allowed. The Data cannot be used for any purposes (including sales promotion) except for designing your machine. If you violate this provision or the laws or regulations, the Company may prohibit you from the use of the Data, the Company’s site and/or take legal action. So long as you comply with these terms and conditions, the Company grants to you a non-exclusive, non-transferable, revocable license to access and use the Data for the sole purpose of assisting you in designing machines that incorporate products.
    In case that the CAD data is found to have been to be used for any purpose other than mentioned above or against the related laws, MISUMI may take legal actions, including the one for blocking the involved user from using CAD data and from accessing to the MISUMI site.
    4. Disclaimer of Warranty
    ANY AND ALL CONTENT APPEARING ON THIS WEB SITE IS PROVIDED FOR INFORMATIONAL PURPOSES ONLY. THIS WEB SITE, ITS CONTENT AND ITS LINKS ARE PROVIDED ON AN "AS IS" AND "AS AVAILABLE" BASIS AND ARE USED ONLY AT YOUR SOLE RISK, TO THE FULLEST EXTENT PERMISSIBLE BY LAW. THE COMPANY DISCLAIMS ALL WARRANTIES, EXPRESS OR IMPLIED, OF ANY KIND, REGARDING THIS WEB SITE (INCLUDING ITS CONTENT, HARDWARE, SOFTWARE AND LINKS), INCLUDING AS TO FITNESS FOR A PARTICULAR PURPOSE, MERCHANTABILITY, TITLE, NON INFRINGEMENT, RESULTS, ACCURACY, COMPLETENESS, ACCESSIBILITY, COMPATIBILITY, SECURITY AND FREEDOM FROM COMPUTER VIRUS. THE COMPANY WILL NOT BE LIABLE FOR ANY DAMAGES OR LOSSES, INCLUDING DIRECT, INDIRECT, CONSEQUENTIAL, SPECIAL, INCIDENTAL OR PUNITIVE DAMAGES AND/OR LOST PROFITS, IN CONNECTION WITH USE OF THE INTERNET, THIS WEB SITE, ITS CONTENT OR ITS LINKS
    Further, the Company will not be liable to you for any failure or delay by the Company to provide access to the Data or any of its obligations under these terms and conditions where such failure or delay is the direct or indirect result of any circumstances beyond the Company's reasonable control (and the Company's obligations will be suspended for the duration of such circumstances).

    CAD Download (Unit Assembly)

    CAD Download: File Format
    生成

    Thank you for downloading the data.

    Click the Good IDEA! button when you find interesting design tips.


    This data is utilized in order to list more useful application examples in the future.

    CAD Data Limitations

    1. Assembly data shows the assembly drawings in the concept design phase. The sole purpose of the data is to explain the structure and functionality of the assembly and is not considered nor to be used as a final design.
      You will need to edit the Data so that it meets your specific design conditions.
    2. Unit assembly Data consists of some sub-assemblies.
      It is configured so that each sub-assembly unit can be used as it is or edited.
    3. * The part in the frame is a sub-assembly unit.

    4. The Data for fabricated parts is based on easy-to-edit dimensions and shapes in sketches and histories.
    5. The Data including the third-part components are made by the Company.

    Page top

Page top