(!)Due to Microsoft's end of support for Internet Explorer 11 on 15/06/2022, this site does not support the recommended environment.
Instead, please kindly use other browsers like Google Chrome, Microsoft Edge or Mozilla Firefox.

ideanote
inCAD Library

Please read before use

What is inCAD Library?

  • Helpful application examples for mechanical engineers.

The Concept of inCAD Library

  • Online application library with a range of ideas for all manufacturing industries.
  • Save design time and learn new design applications when you are concepting new machines.

Disclaimer

  • MISUMI may not offer all parts in each application design. Available parts can only be purchased separately not as a unit shown in each application design.
  • MISUMI does not guarantee quality, accuracy, functionality, safety or reliability for the combination of the parts in each application example. Accept these points prior to use.
  • 2014 Copyright MISUMI
  • The data cannot be used for any purposes (including sales promotion) except for designing your machine.
  • All associated CAD is free. Misumi reserves the right at its sole discretion to cancel, terminate or modify this offer.
  • MISUMI may change, add or delete application examples posted without prior notice.
  • MISUMI assumes no responsibilities for any damage incurred resulting from your use of the Service or any change, addition or deletion by MISUMI of the application examples for any reason whatsoever.

inCAD Library Features

  1. Get great new design ideas for these application examples.
  2. Over 300 design application ideas
    collected from dozens of industries!

  3. Find application examples quickly! Search by function, workpiece shape, etc.

  4. Download the CAD models for each application example.
  5. Log in to download free CAD models.
    Download CAD for the entire application example!

Good IDEA! button

Click the Good IDEA! Button when you like an application example!

*Can only be clicked once per application example.

  • Upper right corner on the page of application example details

  • Pop-up dialog for CAD data downloading

Page top

Keyword Search
No. Search

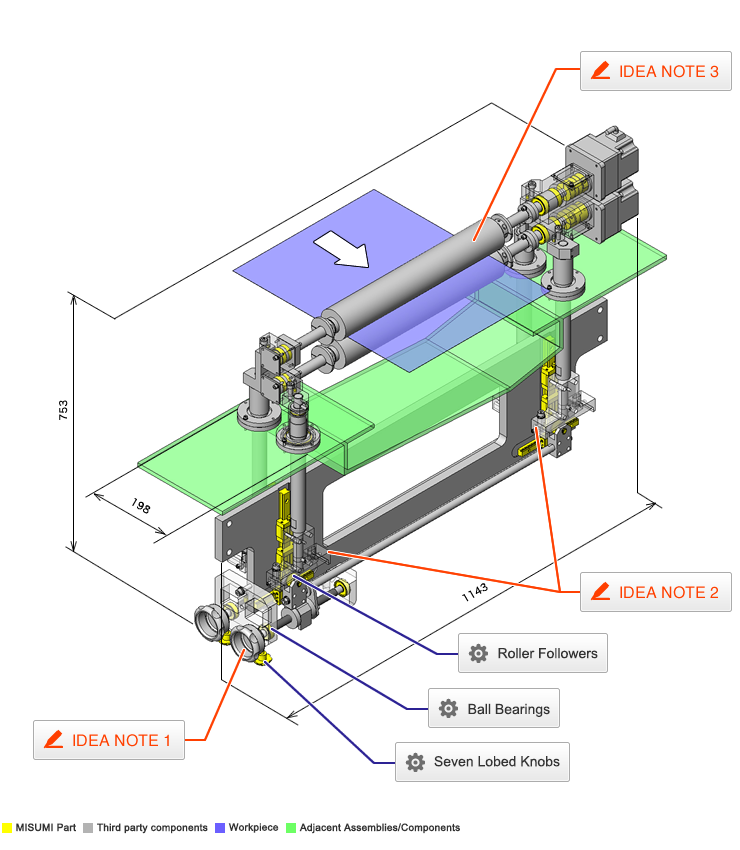
No.000225 Roller Cleaning Mechanism

Glass substrate cleaning using a set of rollers.

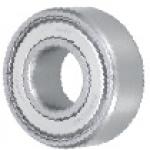
Ball Bearings

Product name 304 Stainless Steel Ball Bearings
Part number SUB6202ZZ
* Orange colored cells in the table below indicate the part numbers used in this example.

Selection criteria

High water resistance against such liquid as cleaning solutions.

Back to page top

Available sizes

■304 SS Ball Bearings

Component Material
Inner and Outer Ring
Shield
Retainer
Ball
304 Stainless Steel

■Sizes and Dimensions

I.D. O.D. Thickness
6 19 6
8 22 7
24 8
10 26
30 9
12 28 8
32 10
15 9
35 11
17 10
40 12
20 42
47 14

Back to page top

Accuracy Info

■Accuracy of Ball Bearings for Special Environment - 304 Stainless Steel

I.D. Tolerance O.D. Tolerance Thickness Tolerance
6    +0.05
0
19 0
  - 0.03
6 0
   -0.12
8 22 7
24 8
10 26
30 9
12 28 8
32 0
   - 0.035
10
15 9
35 11
17 10
40 12
20 42
47 14

Back to page top

Speed/Load (Load Information)

■Load Information of Ball Bearings for Special Environment - 304 Stainless Steel

I.D. O.D. Thickness Basic Load Rating Allowable Rotational Speed
Cr (Dynamic) N Cr (Static) N rpm
6 19 6 52 32 2100
8 22 7 66 41 2000
24 8 67 42 1900
10 26 91 59 1800
30 9 102 72 1500
12 28 8
32 10 136 92
15 9 112 85 1300
35 11 153 113
17 10 120 98 1200
40 12 192 144 1100
20 42 188 152 1000
47 14 256 200 900

Back to page top

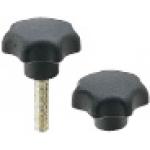
Seven Lobed Knobs

Product name Plastic Knobs - Seven Lobed Knobs
Part number NKSM8-40
* Orange colored cells in the table below indicate the part numbers used in this example.

Selection criteria

Select this product which is suited in manual works for stopper to maintain the height after adjustment.

Back to page top

Available sizes

■Plastic Knobs - Seven Lobed Knobs

Screw Knob Screw
Material Material Surface Treatment
Threaded Nylon 6
(Mat Black)
SWCH10R Carbon Wire Steel (JIS) Trivalent chromate
Tapped Brass (Insert) -

■Sizes and Dimensions

Thread Dia. Thread Length Thread Depth External Shape
10 15 16 20 25 30 40 45 50 55
5 - - - - - 9.5 25
6 - - - - - 12 32
8 - - - - - 14 40
10 - - - - - 18 50
12 - - - - - - - 22 63

Back to page top

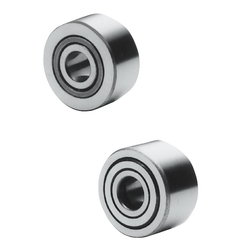
Roller Followers

Product name Roller Followers - Separate
Part number NASTFZ10
* Orange colored cells in the table below indicate the part numbers used in this example.

Selection criteria

Suitable for converting the linear motion of feed screws to up and down motion via cams.

Back to page top

Available sizes

■Roller Followers - Separate

Grease No Seal With Seal Material
Crowned Flat Type Crowned Flat Type
General 52100 Bearing Steel Equivalent
440C Stainless Steel
Low Rebound

■Sizes and Dimensions

O.D.
(mm)
I.D.
(mm)
Thickness (mm)
No Seal With Seal
19 6 9.8 13.8
24 8
30 10 11.8 15.8
32 12
35 15
40 17 15.8 19.8
47 20

Back to page top

Accuracy Info

■Accuracy Information of Roller Followers

Shaft Dia. Tolerance:          0
                     -0.008(mm).

Roller Dia. Tolerance:     0
                     -0.005(mm).

Back to page top

Speed/Load (Load Information)

■Speed
Load of Roller Folloer (Load Information)

I.D.
-O.D.
Basic Dynamic
Load Rating
C(kN)
Basic Static
Load Rating
Cor(kN)
Max.
Allowable Load
(kN)
Track Load Capacity (kN) Max. Rotational Speed (rpm)
No Seal With Seal
Crowned Flat Type Crowned Flat Type No Seal With Seal
φ6−φ19 4.12 4.55 0.36 1.37 3.53 1.37 3.53 20000 8000
φ8−φ24 5.68 5.89 0.78 1.86 4.02 1.86 4.51 17000 6800
φ10−φ30 9.7 9.67 1.42 2.45 5.59 2.45 6.86 15000 6000
φ12−φ32 10.4 10.9 2.11 2.74 5.98 2.74 7.35 13000 5200
φ15−φ35 12.3 14.3 4.73 3.14 8.04 10000 4000
φ17−φ40 17.4 20.9 5.81 3.72 11.8 9500 3800
φ20−φ47 19.2 24.5 4.61 13.8 8500 3400

Back to page top

IDEA NOTE A handle is used for manual height adjustment

Manual height adjustment is made easy using handle.

IDEA NOTE Synchronizing height adjustment

Push bolts and cams are used for synchronized height adjustments.

IDEA NOTE Simplifying brush replacement

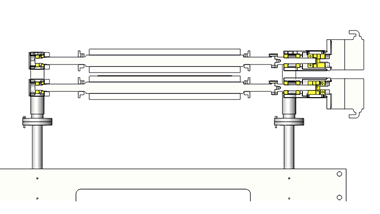
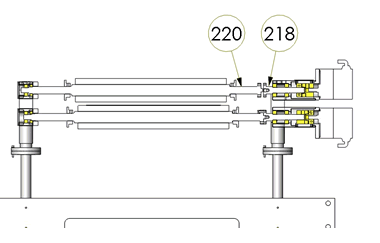
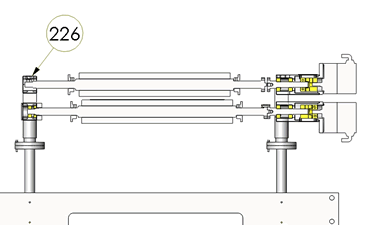
The brush section is designed with a mechanism to be removed together with the shaft in order to simplify brush replacement.

1. Remove the mounting screws of parts No. 218 and 220, and slide No. 220 to left to pull the right end from part No. 218.

2. Remove all the parts that are installed on part No. 226. The bearing, oil seal and collar are to be pulled out to the left side.

3. This enables part No. 220 to be tilted, allowing its left end to be pulled from part No. 226 by moving it to the right (motor) using a small clearance.

  • TERMS AND CONDITIONS FOR USE OF CAD DATA
    Your access to the CAD data that MISUMI Corporation (hereinafter referred to as the Company) posts on this site (including 3D CAD data, intermediate 3D CAD data and 2D CAD data; hereinafter referred to as the Data) are of products manufactured and/or sold by the Company (hereinafter referred to as the Products) assumes that you have read and accepted these terms and conditions which govern your use of the Data. If you do not agree to these terms and conditions, you must stop using this website and the Data. You must not use the Data for any unlawful purpose or in any manner inconsistent with these terms and conditions.
    1. CAD Data
    The Data is prepared for assisting the Company's users in the CAD design process by providing dimensions and other Product information. In order to provide the best speed and stability working within this site, the Product drawings were simplified to reduce the size of the Data. For instance, some of the Products are shown without the oil groove shape, screws or spring shape. Also, please be aware that the tolerance, surface roughness and/or chamfer of the Data may vary from the actual Products.
    2. Disclaimer on Data
    While the Company has carefully prepared the Data, accuracy of the Data is not guaranteed and is subject to the variances as described above. The Company may also modify, add or delete the Data at any time without prior notice. The Company assumes no liability for any direct, indirect, consequential or special damages that you may claim resulted from your use of the Data or any changes to or deletions of the Data regardless of the reason. The Company provides no warranty as to the quality, accuracy, functionality, safety or reliability of the combination of Products and parts. Example applications and combinations of the Products are provided for illustrative purposes only.
    3. Copyright
    Copyrights to the content and the Data belong to the Company or the manufacturers of the Products. The said copyright is protected by the Copyright Act and international treaties. The use (including duplication, modification, uploading, posting, transmission, distribution, licensing, sales and publishing) of the Data except for the purpose to use the Data described above without prior approval of the Company is not allowed. The Data cannot be used for any purposes (including sales promotion) except for designing your machine. If you violate this provision or the laws or regulations, the Company may prohibit you from the use of the Data, the Company’s site and/or take legal action. So long as you comply with these terms and conditions, the Company grants to you a non-exclusive, non-transferable, revocable license to access and use the Data for the sole purpose of assisting you in designing machines that incorporate products.
    In case that the CAD data is found to have been to be used for any purpose other than mentioned above or against the related laws, MISUMI may take legal actions, including the one for blocking the involved user from using CAD data and from accessing to the MISUMI site.
    4. Disclaimer of Warranty
    ANY AND ALL CONTENT APPEARING ON THIS WEB SITE IS PROVIDED FOR INFORMATIONAL PURPOSES ONLY. THIS WEB SITE, ITS CONTENT AND ITS LINKS ARE PROVIDED ON AN "AS IS" AND "AS AVAILABLE" BASIS AND ARE USED ONLY AT YOUR SOLE RISK, TO THE FULLEST EXTENT PERMISSIBLE BY LAW. THE COMPANY DISCLAIMS ALL WARRANTIES, EXPRESS OR IMPLIED, OF ANY KIND, REGARDING THIS WEB SITE (INCLUDING ITS CONTENT, HARDWARE, SOFTWARE AND LINKS), INCLUDING AS TO FITNESS FOR A PARTICULAR PURPOSE, MERCHANTABILITY, TITLE, NON INFRINGEMENT, RESULTS, ACCURACY, COMPLETENESS, ACCESSIBILITY, COMPATIBILITY, SECURITY AND FREEDOM FROM COMPUTER VIRUS. THE COMPANY WILL NOT BE LIABLE FOR ANY DAMAGES OR LOSSES, INCLUDING DIRECT, INDIRECT, CONSEQUENTIAL, SPECIAL, INCIDENTAL OR PUNITIVE DAMAGES AND/OR LOST PROFITS, IN CONNECTION WITH USE OF THE INTERNET, THIS WEB SITE, ITS CONTENT OR ITS LINKS
    Further, the Company will not be liable to you for any failure or delay by the Company to provide access to the Data or any of its obligations under these terms and conditions where such failure or delay is the direct or indirect result of any circumstances beyond the Company's reasonable control (and the Company's obligations will be suspended for the duration of such circumstances).

    CAD Download (Unit Assembly)

    CAD Download: File Format
    生成

    Thank you for downloading the data.

    Click the Good IDEA! button when you find interesting design tips.


    This data is utilized in order to list more useful application examples in the future.

    CAD Data Limitations

    1. Assembly data shows the assembly drawings in the concept design phase. The sole purpose of the data is to explain the structure and functionality of the assembly and is not considered nor to be used as a final design.
      You will need to edit the Data so that it meets your specific design conditions.
    2. Unit assembly Data consists of some sub-assemblies.
      It is configured so that each sub-assembly unit can be used as it is or edited.
    3. * The part in the frame is a sub-assembly unit.

    4. The Data for fabricated parts is based on easy-to-edit dimensions and shapes in sketches and histories.
    5. The Data including the third-part components are made by the Company.

    Page top

  • * Unit assembly Data consists of some sub-assemblies.
       It is configured so that each sub-assembly unit can be used as it is or edited.

Application Overview

Purpose

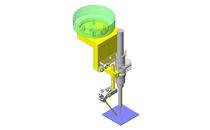
  • Circuit board cleaning unit (height adjustable).

Points for use

  • For clean room environment.
    • A cover is added to protect equipment from splashing of dirt and cleaning agent.

Target workpiece

  • Glass circuit board: W 400 x D 500 x t 0.5mm

Design Specifications

Operating Conditions or Design Requirements

  • Up and down adjustment stroke +/- 5mm
  • External size: W 198 x D 1143 x H 753mm

Required Performance

  • Load of section for up and down: P = 300N

Selection Criteria for Main Components

  • Select the tilting angle of knob, screw and roller follower that are operable for up and down movement by turning the knob manually.

Design Evaluation

Verification of main components

  • Required manual operation force and motor moment of inertia under operating conditions are verified.
    • Condition values: Up and down section load P = 300N, tilting angle of roller follower section α = 6°, efficiency of M16 x 1.0 η = 0.08, lead of M16 x 1.0 L = 1, friction coefficient of linear guide μ = 0.003
    • Force due to up and down section: Fs = P x sinα = 300 x sin6°= 300 x 0.1 = 30N
    • Friction resistance force: Fa = μ x P = 0.003 x 300 = 0.9N
    • Torque to turn knob: T = (FS + FA) x L/(2πη) = (30 + 0.9) x 1/(2π x 0.08) = 78N・mm
    • The force required for turning knob manually is F = 78/40 = 2N≒0.2kg because of knob diameter: 40mm
  • Selection of Motor.
    • Permissible load inertia of moment of motor: JM = 10 x 10-4kg・m²

Other Design Consideration

  • The height adjustment mechanism of brush cleaning is connected by a front/back side shaft.
  • Motor splash cover is easily removable to be cleaned or replaced.
  • A protective cover is separately installed for mechanical elements such as the linear guide during cleaning (omitted in example image).

Explore Similar Application Examples

Page - / -

Part List

No. Part Name Sample Picture MISUMI Part Number
(click the Part Number below for details)
Quantity
1 Retaining Rings SUB6202ZZ 4
2 Ball Bearing STWN10 8
3 Dowel Pins STWN17 2
4 Ball Bearing SUB6203ZZ 4
5 Plastic Knobs MS6-10 4
6 Linear Guides SB6300ZZ 2
7 Linear Guides NKSM8-40 2
8 Roller Followers SSV2R28-220 4
9 Oil Free Seals SSXRZ24-160 4
10 O Ring NASTFZ10 4
11 O Ring MUSC20 2
12 Rotary Shaft NGA25 4
13 Couplings NGA50 8
14 Linear Guides PSFRR10-36-B3-S3 4
15 Metal Fitting For Timing Belts CPOC40-12-16 2
  • The part list above only contains MISUMI parts.
    Part list download (CSV) includes MISUMI and third party components used in this example.
  • TERMS AND CONDITIONS FOR USE OF CAD DATA
    Your access to the CAD data that MISUMI Corporation (hereinafter referred to as the Company) posts on this site (including 3D CAD data, intermediate 3D CAD data and 2D CAD data; hereinafter referred to as the Data) are of products manufactured and/or sold by the Company (hereinafter referred to as the Products) assumes that you have read and accepted these terms and conditions which govern your use of the Data. If you do not agree to these terms and conditions, you must stop using this website and the Data. You must not use the Data for any unlawful purpose or in any manner inconsistent with these terms and conditions.
    1. CAD Data
    The Data is prepared for assisting the Company's users in the CAD design process by providing dimensions and other Product information. In order to provide the best speed and stability working within this site, the Product drawings were simplified to reduce the size of the Data. For instance, some of the Products are shown without the oil groove shape, screws or spring shape. Also, please be aware that the tolerance, surface roughness and/or chamfer of the Data may vary from the actual Products.
    2. Disclaimer on Data
    While the Company has carefully prepared the Data, accuracy of the Data is not guaranteed and is subject to the variances as described above. The Company may also modify, add or delete the Data at any time without prior notice. The Company assumes no liability for any direct, indirect, consequential or special damages that you may claim resulted from your use of the Data or any changes to or deletions of the Data regardless of the reason. The Company provides no warranty as to the quality, accuracy, functionality, safety or reliability of the combination of Products and parts. Example applications and combinations of the Products are provided for illustrative purposes only.
    3. Copyright
    Copyrights to the content and the Data belong to the Company or the manufacturers of the Products. The said copyright is protected by the Copyright Act and international treaties. The use (including duplication, modification, uploading, posting, transmission, distribution, licensing, sales and publishing) of the Data except for the purpose to use the Data described above without prior approval of the Company is not allowed. The Data cannot be used for any purposes (including sales promotion) except for designing your machine. If you violate this provision or the laws or regulations, the Company may prohibit you from the use of the Data, the Company’s site and/or take legal action. So long as you comply with these terms and conditions, the Company grants to you a non-exclusive, non-transferable, revocable license to access and use the Data for the sole purpose of assisting you in designing machines that incorporate products.
    In case that the CAD data is found to have been to be used for any purpose other than mentioned above or against the related laws, MISUMI may take legal actions, including the one for blocking the involved user from using CAD data and from accessing to the MISUMI site.
    4. Disclaimer of Warranty
    ANY AND ALL CONTENT APPEARING ON THIS WEB SITE IS PROVIDED FOR INFORMATIONAL PURPOSES ONLY. THIS WEB SITE, ITS CONTENT AND ITS LINKS ARE PROVIDED ON AN "AS IS" AND "AS AVAILABLE" BASIS AND ARE USED ONLY AT YOUR SOLE RISK, TO THE FULLEST EXTENT PERMISSIBLE BY LAW. THE COMPANY DISCLAIMS ALL WARRANTIES, EXPRESS OR IMPLIED, OF ANY KIND, REGARDING THIS WEB SITE (INCLUDING ITS CONTENT, HARDWARE, SOFTWARE AND LINKS), INCLUDING AS TO FITNESS FOR A PARTICULAR PURPOSE, MERCHANTABILITY, TITLE, NON INFRINGEMENT, RESULTS, ACCURACY, COMPLETENESS, ACCESSIBILITY, COMPATIBILITY, SECURITY AND FREEDOM FROM COMPUTER VIRUS. THE COMPANY WILL NOT BE LIABLE FOR ANY DAMAGES OR LOSSES, INCLUDING DIRECT, INDIRECT, CONSEQUENTIAL, SPECIAL, INCIDENTAL OR PUNITIVE DAMAGES AND/OR LOST PROFITS, IN CONNECTION WITH USE OF THE INTERNET, THIS WEB SITE, ITS CONTENT OR ITS LINKS
    Further, the Company will not be liable to you for any failure or delay by the Company to provide access to the Data or any of its obligations under these terms and conditions where such failure or delay is the direct or indirect result of any circumstances beyond the Company's reasonable control (and the Company's obligations will be suspended for the duration of such circumstances).

    CAD Download (Unit Assembly)

    CAD Download: File Format
    生成

    Thank you for downloading the data.

    Click the Good IDEA! button when you find interesting design tips.


    This data is utilized in order to list more useful application examples in the future.

    CAD Data Limitations

    1. Assembly data shows the assembly drawings in the concept design phase. The sole purpose of the data is to explain the structure and functionality of the assembly and is not considered nor to be used as a final design.
      You will need to edit the Data so that it meets your specific design conditions.
    2. Unit assembly Data consists of some sub-assemblies.
      It is configured so that each sub-assembly unit can be used as it is or edited.
    3. * The part in the frame is a sub-assembly unit.

    4. The Data for fabricated parts is based on easy-to-edit dimensions and shapes in sketches and histories.
    5. The Data including the third-part components are made by the Company.

    Page top

Page top