(!)Due to Microsoft's end of support for Internet Explorer 11 on 15/06/2022, this site does not support the recommended environment.
Instead, please kindly use other browsers like Google Chrome, Microsoft Edge or Mozilla Firefox.

ideanote
inCAD Library

Please read before use

What is inCAD Library?

  • Helpful application examples for mechanical engineers.

The Concept of inCAD Library

  • Online application library with a range of ideas for all manufacturing industries.
  • Save design time and learn new design applications when you are concepting new machines.

Disclaimer

  • MISUMI may not offer all parts in each application design. Available parts can only be purchased separately not as a unit shown in each application design.
  • MISUMI does not guarantee quality, accuracy, functionality, safety or reliability for the combination of the parts in each application example. Accept these points prior to use.
  • 2014 Copyright MISUMI
  • The data cannot be used for any purposes (including sales promotion) except for designing your machine.
  • All associated CAD is free. Misumi reserves the right at its sole discretion to cancel, terminate or modify this offer.
  • MISUMI may change, add or delete application examples posted without prior notice.
  • MISUMI assumes no responsibilities for any damage incurred resulting from your use of the Service or any change, addition or deletion by MISUMI of the application examples for any reason whatsoever.

inCAD Library Features

  1. Get great new design ideas for these application examples.
  2. Over 300 design application ideas
    collected from dozens of industries!

  3. Find application examples quickly! Search by function, workpiece shape, etc.

  4. Download the CAD models for each application example.
  5. Log in to download free CAD models.
    Download CAD for the entire application example!

Good IDEA! button

Click the Good IDEA! Button when you like an application example!

*Can only be clicked once per application example.

  • Upper right corner on the page of application example details

  • Pop-up dialog for CAD data downloading

Page top

Keyword Search
No. Search

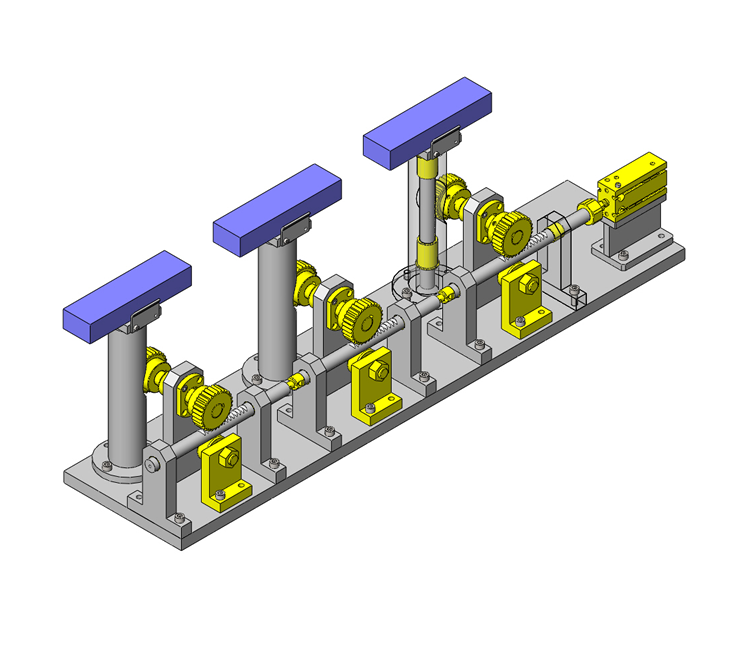
No.000153 Lifting Mechanism Using Rack and Pinions

Pneumatic lifting mechanism.

Relevant category

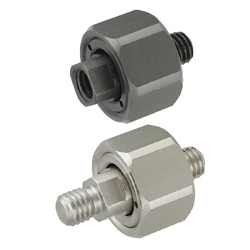
Floating Joint

Product name Floating Connectors - Extra Short Threaded Stud Mount
Part number FJCXS6-1.0
Features Effective when there is limited distance between cylinder and operated object
* Orange colored cells in the table below indicate the part numbers used in this example.

Selection criteria

Effective when there is limited distance between the cylinder and the operated object.

Back to page top

Available sizes

■Floating Connectors - Extra Short Threaded Stud Mount

Body/Cover Joint Spring Washer
Material Surface Treatment Material Surface Treatment Hardness Material Material Surface Treatment Hardness
1045 Carbon Steel Black Oxide 1045 Carbon Steel Black Oxide 35〜45
HRC
304 Stainless Steel−WPB 304 Stainless Steel Nitriding Treatment 600HV〜
304 Stainless Steel 420 Stainless Steel
(440C Stainless Steel)

■Sizes

Thread Dia. - Pitch Tap
Depth
Thread
Length
Allowable
Misalignment
Allowable
Angular Misalignment
Body
Thickness
Body
Hex Size
M5-0.8 14.9 6 0.5 14 24
M6-1.0
M8-1.25 17.1 8.5 15.5 27
M10-1.25 21.9 10 19.5 30
M14-1.5 23.6 11 1 22 38

Back to page top

Oil Free Bushings

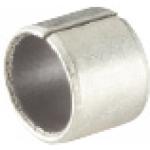
Product name Oil Free Bushings - Multi - Layer LF
Part number MDZB15-15
Features Has a Thin wall and is compact.
* Orange colored cells in the table below indicate the part numbers used in this example.

Selection criteria

Suitable for linear motion applications that do not require high accuracy.

Back to page top

Available sizes

■Oil Free Bushings - Multi - Layer LF

Material
Ethylene Tetrafluoride Resin Layer with Filler Material
Sintered Bronze Layer
Steel-backed Metal Layer (SPCC: Tin Plating)

■Sizes and Dimensions

I.D.(mm) Length(mm)
3 3, (4), 5, (6)
4 (3), 4, (5), 6, (8)
5 (3), 4, 5, 6, (8)
6 (3), (4), 5, 6, 8, (10), (12)
8 (5), 6, 8, 10, 12, (15)
10 6, 8, 10, 12, 15, (20)
12 6, 8, 10, 12, 15, (20)
13 (8), 10, (12), 15, (20)
15 (8), 10, 12, 15, 20, (25)
16 10, (12), 15, 20, (25)
18 10, 12, 15, 20, (25), (30)
20 10, 12, 15, 20, 25, (30)
22 10, 12, 15, 20, (25), (30)
25 10, 12, 15, 20, 25, (30), (35)
30 12, 15, 20, 25, 30, (35), (40), (50)
35 12*, 20, 25, 30, (35), 40, (50)
40 12, (15), 20, 25, 30, (35), 40, (50)
50 20, (25), 30, (35), 40, (50), (60)

Length( ) is for Straight Type only
Length * is for Flanged Type only

Back to page top

Selection Steps

■Multi-Layer LF Bushings Selection Steps

Determine Operating Conditions
Specify the overall dimensions of the slide mechanism, then check required conditions for bushings such as the speed and load.

Specifying the Bearing Dimensions of Multi-Layer LF Bushings.
Confirm the PV value and allowable maximum PV value, as well as the need of external lubrication.

Determining the Bearing Materials of Multi-Layer LF Bushings.
Confirm the operating temperature and atmospheric temperature near the bearing.

Determining the Bearing Peripheral Section of Multi-Layer LF Bushings.
Confirm the materials, roughness and rigidity of housing.

Back to page top

Accuracy Info

■Internal Dia. Tolerance of Multi-Layer LF Bushings

I.D.
(mm)
I.D. tolerance
(mm)
3 -0.025
-0.024
4 -0.025
-0.037
5
6
8 -0.025
-0.040
10
12 -0.025
-0.043
13
15
16
18
20 -0.025
-0.046
22
25
30
35 -0.025
-0.050
40
50

Back to page top

Performance info.

■Allowable properties of Multi-Layer LF Bushing (Reference values)

Non-lubricated
Maximum Allowable Load 49.0N/mm²
Maximum Allowable Velocity 0.65m/s
Maximum Allowable PV Value 3.60N/mm²・m/s

Back to page top

Spur Gears

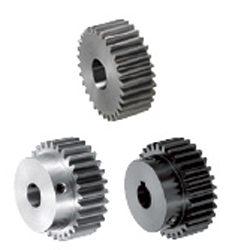
Product name Spur Gears - Pressure Angle 20Deg., Module 1.5
Part number GEAKB1.5-30-15-B-16N
* Orange colored cells in the table below indicate the part numbers used in this example.

Selection criteria

Selected to efficiently convert horizontal motion into multiple vertical motions.

Back to page top

Available sizes

■Spur Gears - Pressure Angle 20Deg., Module 1.5

Material Surface Treatment Accessory
1045 Carbon Steel Set Screw
(4137 Alloy Steel Black Oxide)
Black Oxide
Electroless Nickel Plating
304 Stainless Steel Set Screw(304 Stainless Steel )

■Sizes and Dimensions

Type Module Number of teeth Shaft bore DIA.
(1 mm Increment)
Straight Bore
Straight Bore + Tap
Keyway
Keyway + Tap
Straight Bore


Straight Bore + Tap


Keyway


Keyway+Tap
1.5 12 6-12 8N
13 6-13
14 6-8
16 6-12 8N-12N
17
18 6-13
19 6-15
20 6-16
21
22 6-17
23 6-18 8N-13N
24 6-20 8N-15N
25
26 6-22 8N-17N
27 6-23 8N-18N
28
29 6-24 8N-19N
30
34 6-28 8N-24N
35
36
38 6-31 8N-28N
40 8-31 10N-28N
42
44
45
46
48 8-35 10N-31N
50
52
54 12-35 12N-31N
55
56
58
60 12-38 12N-35N
62
64
65
66
68
70 12-45 12N-42N
72
75
84
85
90
95
100
120 12-49 12N-45N
Gear specifications Shaft Bore Specs. 
Straight Bore Straight Bore
+Tap
Keyway Keyway
+Tap
Diameter Shape
No Hub
With Hub

Back to page top

Accuracy Info

■Accuracy of Spur Gear

Gear accuracy:  Previous JIS B 1702 4 Class (New JIS B 1702-1 - 8 class equivalent)
Shaft Bore Dia. Tolerance:  H7

Back to page top

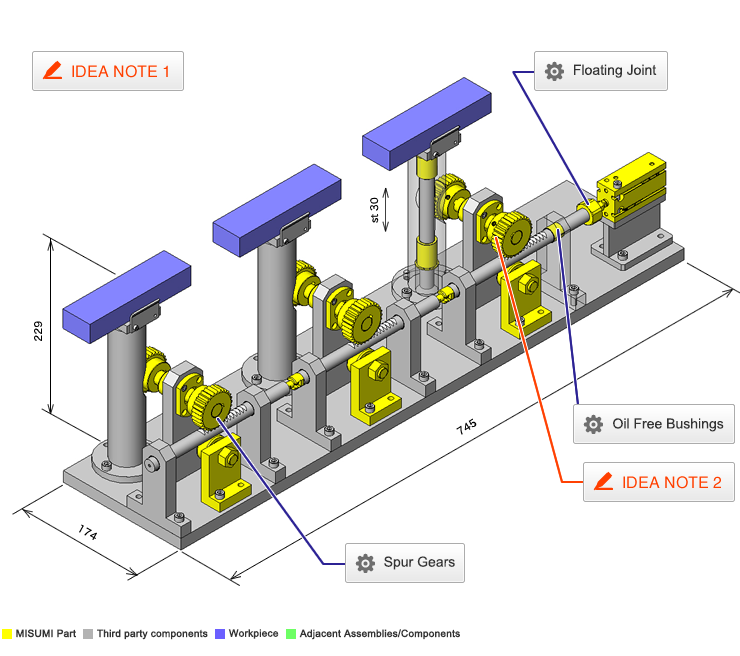
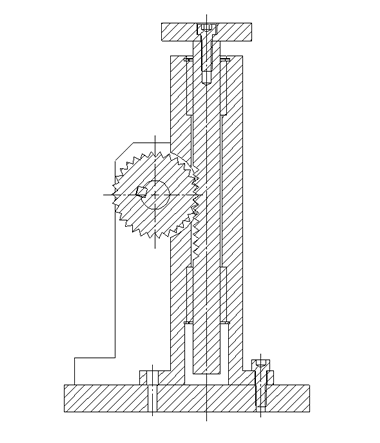
IDEA NOTE Multiple lifters are raised and lowered.

Use multiple rack and pinions in series to operate multiple lifters simultaneously.

IDEA NOTE Convert a horizontal force to a vertical force.

  • TERMS AND CONDITIONS FOR USE OF CAD DATA
    Your access to the CAD data that MISUMI Corporation (hereinafter referred to as the Company) posts on this site (including 3D CAD data, intermediate 3D CAD data and 2D CAD data; hereinafter referred to as the Data) are of products manufactured and/or sold by the Company (hereinafter referred to as the Products) assumes that you have read and accepted these terms and conditions which govern your use of the Data. If you do not agree to these terms and conditions, you must stop using this website and the Data. You must not use the Data for any unlawful purpose or in any manner inconsistent with these terms and conditions.
    1. CAD Data
    The Data is prepared for assisting the Company's users in the CAD design process by providing dimensions and other Product information. In order to provide the best speed and stability working within this site, the Product drawings were simplified to reduce the size of the Data. For instance, some of the Products are shown without the oil groove shape, screws or spring shape. Also, please be aware that the tolerance, surface roughness and/or chamfer of the Data may vary from the actual Products.
    2. Disclaimer on Data
    While the Company has carefully prepared the Data, accuracy of the Data is not guaranteed and is subject to the variances as described above. The Company may also modify, add or delete the Data at any time without prior notice. The Company assumes no liability for any direct, indirect, consequential or special damages that you may claim resulted from your use of the Data or any changes to or deletions of the Data regardless of the reason. The Company provides no warranty as to the quality, accuracy, functionality, safety or reliability of the combination of Products and parts. Example applications and combinations of the Products are provided for illustrative purposes only.
    3. Copyright
    Copyrights to the content and the Data belong to the Company or the manufacturers of the Products. The said copyright is protected by the Copyright Act and international treaties. The use (including duplication, modification, uploading, posting, transmission, distribution, licensing, sales and publishing) of the Data except for the purpose to use the Data described above without prior approval of the Company is not allowed. The Data cannot be used for any purposes (including sales promotion) except for designing your machine. If you violate this provision or the laws or regulations, the Company may prohibit you from the use of the Data, the Company’s site and/or take legal action. So long as you comply with these terms and conditions, the Company grants to you a non-exclusive, non-transferable, revocable license to access and use the Data for the sole purpose of assisting you in designing machines that incorporate products.
    In case that the CAD data is found to have been to be used for any purpose other than mentioned above or against the related laws, MISUMI may take legal actions, including the one for blocking the involved user from using CAD data and from accessing to the MISUMI site.
    4. Disclaimer of Warranty
    ANY AND ALL CONTENT APPEARING ON THIS WEB SITE IS PROVIDED FOR INFORMATIONAL PURPOSES ONLY. THIS WEB SITE, ITS CONTENT AND ITS LINKS ARE PROVIDED ON AN "AS IS" AND "AS AVAILABLE" BASIS AND ARE USED ONLY AT YOUR SOLE RISK, TO THE FULLEST EXTENT PERMISSIBLE BY LAW. THE COMPANY DISCLAIMS ALL WARRANTIES, EXPRESS OR IMPLIED, OF ANY KIND, REGARDING THIS WEB SITE (INCLUDING ITS CONTENT, HARDWARE, SOFTWARE AND LINKS), INCLUDING AS TO FITNESS FOR A PARTICULAR PURPOSE, MERCHANTABILITY, TITLE, NON INFRINGEMENT, RESULTS, ACCURACY, COMPLETENESS, ACCESSIBILITY, COMPATIBILITY, SECURITY AND FREEDOM FROM COMPUTER VIRUS. THE COMPANY WILL NOT BE LIABLE FOR ANY DAMAGES OR LOSSES, INCLUDING DIRECT, INDIRECT, CONSEQUENTIAL, SPECIAL, INCIDENTAL OR PUNITIVE DAMAGES AND/OR LOST PROFITS, IN CONNECTION WITH USE OF THE INTERNET, THIS WEB SITE, ITS CONTENT OR ITS LINKS
    Further, the Company will not be liable to you for any failure or delay by the Company to provide access to the Data or any of its obligations under these terms and conditions where such failure or delay is the direct or indirect result of any circumstances beyond the Company's reasonable control (and the Company's obligations will be suspended for the duration of such circumstances).

    CAD Download (Unit Assembly)

    CAD Download: File Format
    生成

    Thank you for downloading the data.

    Click the Good IDEA! button when you find interesting design tips.


    This data is utilized in order to list more useful application examples in the future.

    CAD Data Limitations

    1. Assembly data shows the assembly drawings in the concept design phase. The sole purpose of the data is to explain the structure and functionality of the assembly and is not considered nor to be used as a final design.
      You will need to edit the Data so that it meets your specific design conditions.
    2. Unit assembly Data consists of some sub-assemblies.
      It is configured so that each sub-assembly unit can be used as it is or edited.
    3. * The part in the frame is a sub-assembly unit.

    4. The Data for fabricated parts is based on easy-to-edit dimensions and shapes in sketches and histories.
    5. The Data including the third-part components are made by the Company.

    Page top

  • * Unit assembly Data consists of some sub-assemblies.
       It is configured so that each sub-assembly unit can be used as it is or edited.

Application Overview

Purpose

  • Purpose
    • To raise and lower multiple lifters using one air cylinder.
  • Operation
    • Use several rack and gear sets to move the lifters.

Points for use

  • Individual workpieces are raised and lowered at the same time.

Target workpiece

  • Shape: Connector
  • Size: W150 x D40 x H25mm
    Weight: 0.3 (3×0.1)Kg

Design Specifications

Operating Conditions or Design Requirements

  • Upstroke/Downstroke: 30mm
  • External dimensions: W174 x D745 x H229mm

Required Performance

  • Load: Workpiece + lifting plate + racks = 12.8N

Selection Criteria for Main Components

  • Select a cylinder with a tube inner diameter of φ20mm to lift the load (12.8N)

Design Evaluation

Verification of main components

  • Validate cylinder thrust based on the applied load.
  • Cylinder selection.
    • Cylinder thrust.
      Conditions (values): Mass applied to a gear (W) = 1.3kg, gravitational acceleration (g) =9.8m/s², and friction coefficient of the rack and pinions (μ) = 1.
    • Load F₁=μWg=1×1.3×9.8=12.8N
    • Where the operating pressure is 0.5Mpa, cylinder thrust F₂=132N

Other Design Consideration

  • Three sets of rack and pinions can be assembled using common parts.
    When installing the gears, their positions should be adjusted to reduce backlash.

Explore Similar Application Examples

Page - / -

Part List

No. Part Name Sample Picture MISUMI Part Number
(click the Part Number below for details)
Quantity
1 Floating Joints MSCFA20-30 1
2 Tip Connection Joints FJCXS6-1.0 1
3 Spur Gear MDZB15-15 6
4 Rotary Shaft FJMW4-0.7 2
5 Parallel Keys TCMJS8-10-M6 2
6 Flanged Oil Free Bushings GEAKB1.5-30-15-B-16N 6
7 Metal Bushing PSFGKR16-112.0-KA5-A12-KB95-B12 3
8 Retaining Rings KESS5-12 6
9 Sensors for Air Cylinders MDCA16 3
10 Cam Followers SMZ15-30 6
11 Standard and Precision Metal Collars RTWN24 6
12 Standard and Precision Metal Collars MD13L3 2
13 Couplings CMFLSF12-54 3
14 Ball Bearing NCLM16-20-15 3
15 Roller Followers NCLM16-20-16 3
  • The part list above only contains MISUMI parts.
    Part list download (CSV) includes MISUMI and third party components used in this example.
  • TERMS AND CONDITIONS FOR USE OF CAD DATA
    Your access to the CAD data that MISUMI Corporation (hereinafter referred to as the Company) posts on this site (including 3D CAD data, intermediate 3D CAD data and 2D CAD data; hereinafter referred to as the Data) are of products manufactured and/or sold by the Company (hereinafter referred to as the Products) assumes that you have read and accepted these terms and conditions which govern your use of the Data. If you do not agree to these terms and conditions, you must stop using this website and the Data. You must not use the Data for any unlawful purpose or in any manner inconsistent with these terms and conditions.
    1. CAD Data
    The Data is prepared for assisting the Company's users in the CAD design process by providing dimensions and other Product information. In order to provide the best speed and stability working within this site, the Product drawings were simplified to reduce the size of the Data. For instance, some of the Products are shown without the oil groove shape, screws or spring shape. Also, please be aware that the tolerance, surface roughness and/or chamfer of the Data may vary from the actual Products.
    2. Disclaimer on Data
    While the Company has carefully prepared the Data, accuracy of the Data is not guaranteed and is subject to the variances as described above. The Company may also modify, add or delete the Data at any time without prior notice. The Company assumes no liability for any direct, indirect, consequential or special damages that you may claim resulted from your use of the Data or any changes to or deletions of the Data regardless of the reason. The Company provides no warranty as to the quality, accuracy, functionality, safety or reliability of the combination of Products and parts. Example applications and combinations of the Products are provided for illustrative purposes only.
    3. Copyright
    Copyrights to the content and the Data belong to the Company or the manufacturers of the Products. The said copyright is protected by the Copyright Act and international treaties. The use (including duplication, modification, uploading, posting, transmission, distribution, licensing, sales and publishing) of the Data except for the purpose to use the Data described above without prior approval of the Company is not allowed. The Data cannot be used for any purposes (including sales promotion) except for designing your machine. If you violate this provision or the laws or regulations, the Company may prohibit you from the use of the Data, the Company’s site and/or take legal action. So long as you comply with these terms and conditions, the Company grants to you a non-exclusive, non-transferable, revocable license to access and use the Data for the sole purpose of assisting you in designing machines that incorporate products.
    In case that the CAD data is found to have been to be used for any purpose other than mentioned above or against the related laws, MISUMI may take legal actions, including the one for blocking the involved user from using CAD data and from accessing to the MISUMI site.
    4. Disclaimer of Warranty
    ANY AND ALL CONTENT APPEARING ON THIS WEB SITE IS PROVIDED FOR INFORMATIONAL PURPOSES ONLY. THIS WEB SITE, ITS CONTENT AND ITS LINKS ARE PROVIDED ON AN "AS IS" AND "AS AVAILABLE" BASIS AND ARE USED ONLY AT YOUR SOLE RISK, TO THE FULLEST EXTENT PERMISSIBLE BY LAW. THE COMPANY DISCLAIMS ALL WARRANTIES, EXPRESS OR IMPLIED, OF ANY KIND, REGARDING THIS WEB SITE (INCLUDING ITS CONTENT, HARDWARE, SOFTWARE AND LINKS), INCLUDING AS TO FITNESS FOR A PARTICULAR PURPOSE, MERCHANTABILITY, TITLE, NON INFRINGEMENT, RESULTS, ACCURACY, COMPLETENESS, ACCESSIBILITY, COMPATIBILITY, SECURITY AND FREEDOM FROM COMPUTER VIRUS. THE COMPANY WILL NOT BE LIABLE FOR ANY DAMAGES OR LOSSES, INCLUDING DIRECT, INDIRECT, CONSEQUENTIAL, SPECIAL, INCIDENTAL OR PUNITIVE DAMAGES AND/OR LOST PROFITS, IN CONNECTION WITH USE OF THE INTERNET, THIS WEB SITE, ITS CONTENT OR ITS LINKS
    Further, the Company will not be liable to you for any failure or delay by the Company to provide access to the Data or any of its obligations under these terms and conditions where such failure or delay is the direct or indirect result of any circumstances beyond the Company's reasonable control (and the Company's obligations will be suspended for the duration of such circumstances).

    CAD Download (Unit Assembly)

    CAD Download: File Format
    生成

    Thank you for downloading the data.

    Click the Good IDEA! button when you find interesting design tips.


    This data is utilized in order to list more useful application examples in the future.

    CAD Data Limitations

    1. Assembly data shows the assembly drawings in the concept design phase. The sole purpose of the data is to explain the structure and functionality of the assembly and is not considered nor to be used as a final design.
      You will need to edit the Data so that it meets your specific design conditions.
    2. Unit assembly Data consists of some sub-assemblies.
      It is configured so that each sub-assembly unit can be used as it is or edited.
    3. * The part in the frame is a sub-assembly unit.

    4. The Data for fabricated parts is based on easy-to-edit dimensions and shapes in sketches and histories.
    5. The Data including the third-part components are made by the Company.

    Page top

Page top