(!)Due to Microsoft's end of support for Internet Explorer 11 on 15/06/2022, this site does not support the recommended environment.
Instead, please kindly use other browsers like Google Chrome, Microsoft Edge or Mozilla Firefox.

ideanote
inCAD Library

Please read before use

What is inCAD Library?

  • Helpful application examples for mechanical engineers.

The Concept of inCAD Library

  • Online application library with a range of ideas for all manufacturing industries.
  • Save design time and learn new design applications when you are concepting new machines.

Disclaimer

  • MISUMI may not offer all parts in each application design. Available parts can only be purchased separately not as a unit shown in each application design.
  • MISUMI does not guarantee quality, accuracy, functionality, safety or reliability for the combination of the parts in each application example. Accept these points prior to use.
  • 2014 Copyright MISUMI
  • The data cannot be used for any purposes (including sales promotion) except for designing your machine.
  • All associated CAD is free. Misumi reserves the right at its sole discretion to cancel, terminate or modify this offer.
  • MISUMI may change, add or delete application examples posted without prior notice.
  • MISUMI assumes no responsibilities for any damage incurred resulting from your use of the Service or any change, addition or deletion by MISUMI of the application examples for any reason whatsoever.

inCAD Library Features

  1. Get great new design ideas for these application examples.
  2. Over 300 design application ideas
    collected from dozens of industries!

  3. Find application examples quickly! Search by function, workpiece shape, etc.

  4. Download the CAD models for each application example.
  5. Log in to download free CAD models.
    Download CAD for the entire application example!

Good IDEA! button

Click the Good IDEA! Button when you like an application example!

*Can only be clicked once per application example.

  • Upper right corner on the page of application example details

  • Pop-up dialog for CAD data downloading

Page top

Keyword Search
No. Search

No.000266 Glass Circuit Board Conveyor

Motor driven conveying system using a system of rollers, pulleys, and belts.

Relevant category

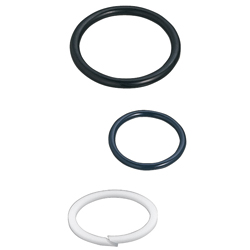
O-Ring

Product name O-Rings - P Series
Part number NPA32
* Orange colored cells in the table below indicate the part numbers used in this example.

Selection criteria

To transport a workpiece without damaging it

Back to page top

Available sizes

■O-Rings - P Series

Material Hardness
(JIS Hs)
Color Operable
Temperature Range
JIS Symbol Usage
Nitrile Rubber 70±5 Black -30-100℃ Class 1 A Mineral Oil Resistant
90±5 Black -25-100℃ Class 1 B
Silicon Rubber 50±5 Milky White -50-200℃ Heat Resistant
70±5 Navy -50-200℃ Class 4 C
Fluororubber 70±5 Black -15-200℃ Class 4 D
90±5 Black -15-200℃
Ethylene
Propylene Rubber
70±5 Black -45-130℃ For Weather Resistant Items

■Sizes and Dimensions (excerpt)

JIS
Nominal Number
Ring I.D. Ring
Wire Dia.
Against O-ring of
Opposite Side Diameter
Internal Contact External Contact
P22 φ21.8 φ2.4 φ22 φ26
P22A φ21.7 φ3.5 φ22 φ28
P22.4 φ22.1 φ22.4 φ28.4
P24 φ23.7 φ24 φ30
P25 φ24.7 φ25 φ31
P25.5 φ25.2 φ25.5 φ31.5
P26 φ25.7 φ26 φ32
P28 φ27.7 φ28 φ34
P29 φ28.7 φ29 φ35
P29.5 φ29.2 φ29.5 φ35.5
P30 φ29.7 φ30 φ36
P31 φ30.7 φ31 φ37
P31.5 φ31.2 φ31.5 φ37.5
P32 φ31.7 φ32 φ38
P34 φ33.7 φ34 φ40
P35 φ34.7 φ35 φ41
P35.5 φ35.2 φ35.5 φ41.5
P36 φ35.7 φ36 φ42
P38 φ37.7 φ38 φ44
P39 φ38.7 φ39 φ45
P40 φ39.7 φ40 φ46
P41 φ40.7 φ41 φ47
P42 φ41.7 φ42 φ48
P44 φ43.7 φ44 φ50
P45 φ44.7 φ45 φ51
P46 φ45.7 φ46 φ52
P48 φ47.7 φ48 φ54
P50 φ49.7 φ50 φ56

* Please see the product pages for other diameter rings

Back to page top

Accuracy Info

Ring Wire DIA. Tolerance:

Wire Dia. Tolerance
φ1.9 ±0.08
φ2.4 ±0.09
φ3.5 ±0.10
φ5.7 ±0.13

Parting Surface Burr Height:  0.1 or less

Parting Surface Burr Width:  0.15 or less

Ring I.D. Tolerance;

JIS
Nominal Number
Ring I.D. Tolerance
Nitrile Silicone
Nitrile
Fluorine
P22 φ21.8 ±0.24 ±0.36 ±0.28
P22A φ21.7
P22.4 φ22.1
P24 φ23.7
P25 φ24.7 ±0.25 ±0.37 ±0.30
P25.5 φ25.2
P26 φ25.7 ±0.26 ±0.39 ±0.31
P28 φ27.7 ±0.28 ±0.42 ±0.33
P29 φ28.7 ±0.29 ±0.43 ±0.34
P29.5 φ29.2
P30 φ29.7
P31 φ30.7 ±0.30 ±0.45 ±0.36
P31.5 φ31.2 ±0.31 ±0.46 ±0.37
P32 φ31.7
P34 φ33.7 ±0.33 ±0.49 ±0.39
P35 φ34.7 ±0.34 ±0.51 ±0.40
P35.5 φ35.2
P36 φ35.7
P38 φ37.7 ±0.37 ±0.55 ±0.44
P39 φ38.7
P40 φ39.7
P41 φ40.7 ±0.38 ±0.57 ±0.45
P42 φ41.7 ±0.39 ±0.58 ±0.48
P44 φ43.7 ±0.41 ±0.61 ±0.49
P45 φ44.7
P46 φ45.7 ±0.42 ±0.63 ±0.50
P48 φ47.7 ±0.44 ±0.66 ±0.52
P50 φ49.7 ±0.45 ±0.67 ±0.54

Back to page top

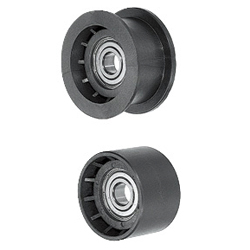
Idler

Product name Idler Pulleys - Resin, Flat / Flanged
Part number TPBSN38-15
Features Can be used as the tension adjuster for timing belts.
* Orange colored cells in the table below indicate the part numbers used in this example.

Selection criteria

Used for tension adjustment of a timing belt

Back to page top

Available sizes

■Idler Pulleys - Resin, Flat / Flanged

Body Material Bearing Material
Glass Reinforced Nylon
(engineered plastic)
Steel

■Sizes

Nominal Dia.
of the Idler
Overall Width Inner Width O.D. Bearing No.
to Use
Applicable
Idler Shaft
Flanged No Flange Flanged
φ38 18 18 15 φ42 6200ZZ WS010S
φ40 26 26 20 φ48 6201ZZ WS116S・WS122S
φ45 25 25 φ50 6202ZZ WS216S
φ46 φ52 6201ZZ WS112S・WS116S
φ50 31 31 25 φ62 WS116S・WS122S
φ60 36 30 φ66
φ70 35 28 φ80 6202ZZ WS216S・WS222S

Back to page top

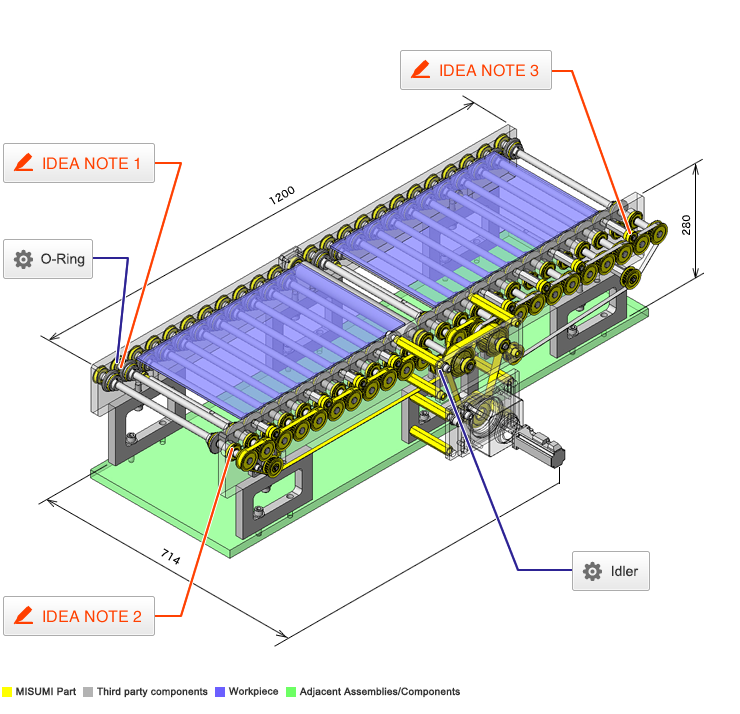
IDEA NOTE Circuit board contact

An O-ring is used on the roller for contacting the sides and edges of the circuit board.

IDEA NOTE Rollers serve as a width guide

The roller attached with the O-ring is flanged and the flange guides the workpiece in the widthwise direction.

IDEA NOTE Idler

Idler presses the belt from the top, creating proper tensioning between belt and pulleys.

  • TERMS AND CONDITIONS FOR USE OF CAD DATA
    Your access to the CAD data that MISUMI Corporation (hereinafter referred to as the Company) posts on this site (including 3D CAD data, intermediate 3D CAD data and 2D CAD data; hereinafter referred to as the Data) are of products manufactured and/or sold by the Company (hereinafter referred to as the Products) assumes that you have read and accepted these terms and conditions which govern your use of the Data. If you do not agree to these terms and conditions, you must stop using this website and the Data. You must not use the Data for any unlawful purpose or in any manner inconsistent with these terms and conditions.
    1. CAD Data
    The Data is prepared for assisting the Company's users in the CAD design process by providing dimensions and other Product information. In order to provide the best speed and stability working within this site, the Product drawings were simplified to reduce the size of the Data. For instance, some of the Products are shown without the oil groove shape, screws or spring shape. Also, please be aware that the tolerance, surface roughness and/or chamfer of the Data may vary from the actual Products.
    2. Disclaimer on Data
    While the Company has carefully prepared the Data, accuracy of the Data is not guaranteed and is subject to the variances as described above. The Company may also modify, add or delete the Data at any time without prior notice. The Company assumes no liability for any direct, indirect, consequential or special damages that you may claim resulted from your use of the Data or any changes to or deletions of the Data regardless of the reason. The Company provides no warranty as to the quality, accuracy, functionality, safety or reliability of the combination of Products and parts. Example applications and combinations of the Products are provided for illustrative purposes only.
    3. Copyright
    Copyrights to the content and the Data belong to the Company or the manufacturers of the Products. The said copyright is protected by the Copyright Act and international treaties. The use (including duplication, modification, uploading, posting, transmission, distribution, licensing, sales and publishing) of the Data except for the purpose to use the Data described above without prior approval of the Company is not allowed. The Data cannot be used for any purposes (including sales promotion) except for designing your machine. If you violate this provision or the laws or regulations, the Company may prohibit you from the use of the Data, the Company’s site and/or take legal action. So long as you comply with these terms and conditions, the Company grants to you a non-exclusive, non-transferable, revocable license to access and use the Data for the sole purpose of assisting you in designing machines that incorporate products.
    In case that the CAD data is found to have been to be used for any purpose other than mentioned above or against the related laws, MISUMI may take legal actions, including the one for blocking the involved user from using CAD data and from accessing to the MISUMI site.
    4. Disclaimer of Warranty
    ANY AND ALL CONTENT APPEARING ON THIS WEB SITE IS PROVIDED FOR INFORMATIONAL PURPOSES ONLY. THIS WEB SITE, ITS CONTENT AND ITS LINKS ARE PROVIDED ON AN "AS IS" AND "AS AVAILABLE" BASIS AND ARE USED ONLY AT YOUR SOLE RISK, TO THE FULLEST EXTENT PERMISSIBLE BY LAW. THE COMPANY DISCLAIMS ALL WARRANTIES, EXPRESS OR IMPLIED, OF ANY KIND, REGARDING THIS WEB SITE (INCLUDING ITS CONTENT, HARDWARE, SOFTWARE AND LINKS), INCLUDING AS TO FITNESS FOR A PARTICULAR PURPOSE, MERCHANTABILITY, TITLE, NON INFRINGEMENT, RESULTS, ACCURACY, COMPLETENESS, ACCESSIBILITY, COMPATIBILITY, SECURITY AND FREEDOM FROM COMPUTER VIRUS. THE COMPANY WILL NOT BE LIABLE FOR ANY DAMAGES OR LOSSES, INCLUDING DIRECT, INDIRECT, CONSEQUENTIAL, SPECIAL, INCIDENTAL OR PUNITIVE DAMAGES AND/OR LOST PROFITS, IN CONNECTION WITH USE OF THE INTERNET, THIS WEB SITE, ITS CONTENT OR ITS LINKS
    Further, the Company will not be liable to you for any failure or delay by the Company to provide access to the Data or any of its obligations under these terms and conditions where such failure or delay is the direct or indirect result of any circumstances beyond the Company's reasonable control (and the Company's obligations will be suspended for the duration of such circumstances).

    CAD Download (Unit Assembly)

    CAD Download: File Format
    生成

    Thank you for downloading the data.

    Click the Good IDEA! button when you find interesting design tips.


    This data is utilized in order to list more useful application examples in the future.

    CAD Data Limitations

    1. Assembly data shows the assembly drawings in the concept design phase. The sole purpose of the data is to explain the structure and functionality of the assembly and is not considered nor to be used as a final design.
      You will need to edit the Data so that it meets your specific design conditions.
    2. Unit assembly Data consists of some sub-assemblies.
      It is configured so that each sub-assembly unit can be used as it is or edited.
    3. * The part in the frame is a sub-assembly unit.

    4. The Data for fabricated parts is based on easy-to-edit dimensions and shapes in sketches and histories.
    5. The Data including the third-part components are made by the Company.

    Page top

  • * Unit assembly Data consists of some sub-assemblies.
       It is configured so that each sub-assembly unit can be used as it is or edited.

Application Overview

Purpose

  • Purpose: transferring glass circuit boards.
    Operation: Rollers are each attached with an O-ring for proper contact with the sides and edges of the glass circuit boards.

Target workpiece

  • Shape: glass circuit board
  • Size: t0.5 x W300 x D500mm

Design Specifications

Operating Conditions or Design Requirements

  • Outer dimensions: W1200 x D714 x H280mm
  • Transfer speed: 100mm/s

Required Performance

  • Load: workpiece + belt = 50N
  • Widthwise positioning accuracy: ±1mm

Selection Criteria for Main Components

  • A motor that can transfer a load of 50N at a speed of over 70mm/s is selected.

Design Evaluation

Verification of main components

  • The torque of the motor and reducer is verified based on the load torque.
    • Conditional value: pulley diameter D = 0.039m, friction coefficient μ = 0.3, efficiency η = 0.9, gear head efficiency ηG = 0.5, gear ratio G = 81, motor torque TM = 0.32N·m, motor rated rotation speed N = 3000rpm, load M = 50N
    • Load torque: T = F x D/2 x η = μ x M x D/2 x η = 0.3 x 50 x 0.039/2 x 0.9 = 0.33N·m
    • Torque of motor and reducer: G = TM x G x ηG = 0.32 x 81 x 0.5 = 13N·m
      > 0.33N·m = T
      -> There is no problem.
    • Transfer speed: V = N x D x π/G x 60 = 3000 x 39 x π/81 x 60 = 75.6mm/s

Other Design Consideration

  • The conveying system is driven by a single motor.
  • An adhesive rubber roller is installed for dust removal.

Explore Similar Application Examples

Page - / -

Part List

No. Part Name Sample Picture MISUMI Part Number
(click the Part Number below for details)
Quantity
1 Timing Belts SMSB10-30 6
2 Idlers/Idlers Shafts NPA32 46
3 Flanged Idler TUN240L075 1
4 Timing Pulleys TUN630XL037 1
5 Timing Pulleys TPBSN38-15 1
6 Timing Pulleys AATFW22-XL037-8 4
7 Timing Pulleys ATP25XL037-B-P15-KC90 24
8 Hex Posts ATPA20L075-A-N15 1
9 Hex Posts ATPA20L075-B-N15 1
10 Retaining Rings ATPA20L075-B-N24 1
11 Retaining Rings-External SLSBJ19-115-M10-N10 4
12 Retaining Rings-External SLSBWF19-105 4
13 Retaining Rings STWN8 4
14 Parallel Keys STWN10 9
15 Parallel Keys STWN12 2
16 Deep Groove Ball Bearings STWN15 108
17 Deep Groove Ball Bearings KES5-20 1
18 Deep Groove Ball Bearings KES5-30 1
19 Ball Bearing B6202ZZNR 48
20 Couplings B6202ZZ 1
21 Deep Groove/Double Shielded B6000ZZ 16
22 Tensioner B6201ZZ 2
  • The part list above only contains MISUMI parts.
    Part list download (CSV) includes MISUMI and third party components used in this example.
  • TERMS AND CONDITIONS FOR USE OF CAD DATA
    Your access to the CAD data that MISUMI Corporation (hereinafter referred to as the Company) posts on this site (including 3D CAD data, intermediate 3D CAD data and 2D CAD data; hereinafter referred to as the Data) are of products manufactured and/or sold by the Company (hereinafter referred to as the Products) assumes that you have read and accepted these terms and conditions which govern your use of the Data. If you do not agree to these terms and conditions, you must stop using this website and the Data. You must not use the Data for any unlawful purpose or in any manner inconsistent with these terms and conditions.
    1. CAD Data
    The Data is prepared for assisting the Company's users in the CAD design process by providing dimensions and other Product information. In order to provide the best speed and stability working within this site, the Product drawings were simplified to reduce the size of the Data. For instance, some of the Products are shown without the oil groove shape, screws or spring shape. Also, please be aware that the tolerance, surface roughness and/or chamfer of the Data may vary from the actual Products.
    2. Disclaimer on Data
    While the Company has carefully prepared the Data, accuracy of the Data is not guaranteed and is subject to the variances as described above. The Company may also modify, add or delete the Data at any time without prior notice. The Company assumes no liability for any direct, indirect, consequential or special damages that you may claim resulted from your use of the Data or any changes to or deletions of the Data regardless of the reason. The Company provides no warranty as to the quality, accuracy, functionality, safety or reliability of the combination of Products and parts. Example applications and combinations of the Products are provided for illustrative purposes only.
    3. Copyright
    Copyrights to the content and the Data belong to the Company or the manufacturers of the Products. The said copyright is protected by the Copyright Act and international treaties. The use (including duplication, modification, uploading, posting, transmission, distribution, licensing, sales and publishing) of the Data except for the purpose to use the Data described above without prior approval of the Company is not allowed. The Data cannot be used for any purposes (including sales promotion) except for designing your machine. If you violate this provision or the laws or regulations, the Company may prohibit you from the use of the Data, the Company’s site and/or take legal action. So long as you comply with these terms and conditions, the Company grants to you a non-exclusive, non-transferable, revocable license to access and use the Data for the sole purpose of assisting you in designing machines that incorporate products.
    In case that the CAD data is found to have been to be used for any purpose other than mentioned above or against the related laws, MISUMI may take legal actions, including the one for blocking the involved user from using CAD data and from accessing to the MISUMI site.
    4. Disclaimer of Warranty
    ANY AND ALL CONTENT APPEARING ON THIS WEB SITE IS PROVIDED FOR INFORMATIONAL PURPOSES ONLY. THIS WEB SITE, ITS CONTENT AND ITS LINKS ARE PROVIDED ON AN "AS IS" AND "AS AVAILABLE" BASIS AND ARE USED ONLY AT YOUR SOLE RISK, TO THE FULLEST EXTENT PERMISSIBLE BY LAW. THE COMPANY DISCLAIMS ALL WARRANTIES, EXPRESS OR IMPLIED, OF ANY KIND, REGARDING THIS WEB SITE (INCLUDING ITS CONTENT, HARDWARE, SOFTWARE AND LINKS), INCLUDING AS TO FITNESS FOR A PARTICULAR PURPOSE, MERCHANTABILITY, TITLE, NON INFRINGEMENT, RESULTS, ACCURACY, COMPLETENESS, ACCESSIBILITY, COMPATIBILITY, SECURITY AND FREEDOM FROM COMPUTER VIRUS. THE COMPANY WILL NOT BE LIABLE FOR ANY DAMAGES OR LOSSES, INCLUDING DIRECT, INDIRECT, CONSEQUENTIAL, SPECIAL, INCIDENTAL OR PUNITIVE DAMAGES AND/OR LOST PROFITS, IN CONNECTION WITH USE OF THE INTERNET, THIS WEB SITE, ITS CONTENT OR ITS LINKS
    Further, the Company will not be liable to you for any failure or delay by the Company to provide access to the Data or any of its obligations under these terms and conditions where such failure or delay is the direct or indirect result of any circumstances beyond the Company's reasonable control (and the Company's obligations will be suspended for the duration of such circumstances).

    CAD Download (Unit Assembly)

    CAD Download: File Format
    生成

    Thank you for downloading the data.

    Click the Good IDEA! button when you find interesting design tips.


    This data is utilized in order to list more useful application examples in the future.

    CAD Data Limitations

    1. Assembly data shows the assembly drawings in the concept design phase. The sole purpose of the data is to explain the structure and functionality of the assembly and is not considered nor to be used as a final design.
      You will need to edit the Data so that it meets your specific design conditions.
    2. Unit assembly Data consists of some sub-assemblies.
      It is configured so that each sub-assembly unit can be used as it is or edited.
    3. * The part in the frame is a sub-assembly unit.

    4. The Data for fabricated parts is based on easy-to-edit dimensions and shapes in sketches and histories.
    5. The Data including the third-part components are made by the Company.

    Page top

Page top