(!)Due to Microsoft's end of support for Internet Explorer 11 on 15/06/2022, this site does not support the recommended environment.
Instead, please kindly use other browsers like Google Chrome, Microsoft Edge or Mozilla Firefox.

ideanote
inCAD Library

Please read before use

What is inCAD Library?

  • Helpful application examples for mechanical engineers.

The Concept of inCAD Library

  • Online application library with a range of ideas for all manufacturing industries.
  • Save design time and learn new design applications when you are concepting new machines.

Disclaimer

  • MISUMI may not offer all parts in each application design. Available parts can only be purchased separately not as a unit shown in each application design.
  • MISUMI does not guarantee quality, accuracy, functionality, safety or reliability for the combination of the parts in each application example. Accept these points prior to use.
  • 2014 Copyright MISUMI
  • The data cannot be used for any purposes (including sales promotion) except for designing your machine.
  • All associated CAD is free. Misumi reserves the right at its sole discretion to cancel, terminate or modify this offer.
  • MISUMI may change, add or delete application examples posted without prior notice.
  • MISUMI assumes no responsibilities for any damage incurred resulting from your use of the Service or any change, addition or deletion by MISUMI of the application examples for any reason whatsoever.

inCAD Library Features

  1. Get great new design ideas for these application examples.
  2. Over 300 design application ideas
    collected from dozens of industries!

  3. Find application examples quickly! Search by function, workpiece shape, etc.

  4. Download the CAD models for each application example.
  5. Log in to download free CAD models.
    Download CAD for the entire application example!

Good IDEA! button

Click the Good IDEA! Button when you like an application example!

*Can only be clicked once per application example.

  • Upper right corner on the page of application example details

  • Pop-up dialog for CAD data downloading

Page top

Keyword Search
No. Search

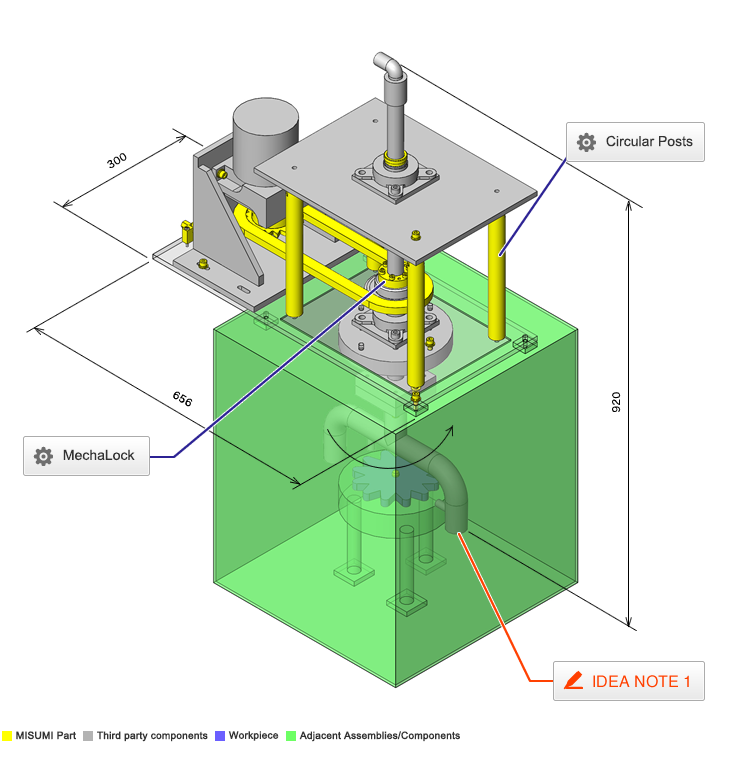
No.000233 Cleaning Chamber

A set of nozzles are rotated to spray clean a workpiece.

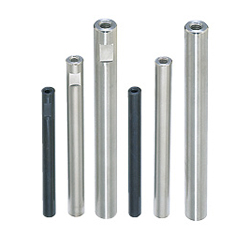
Circular Posts

Product name Circular Posts - Both Ends Tapped With Standard Wrench Flat, Standard L Dimension
Part number SETS30-300-SC30-M8-N8
Features The dimensions and thread diameter are configurable. And installation or removal of Wrench Flats can be selected.
* Orange colored cells in the table below indicate the part numbers used in this example.

Selection criteria

It is suitable as a spacer to install bearings with a certain distance to each other.

Available sizes

■Circular Posts - Both Ends Tapped With Standard Wrench Flat, Standard L Dimension

Material Surface Treatment
1018 Carbon Steel -
Black Oxide Coating
Electroless Nickel Plating
Trivalent Chromate (Black)
304 Stainless Steel -
2017 Aluminum Alloy Clear Anodize

■Sizes and Dimensions

Post Diameter. Overall Length
(specified in 1 mm increment)
Tapped Wrench Groove
Diameter (coarse) (select individually for each end) Depth Opposite Side Slot Width
M2.6 M3 M4 M5 M6 M8 M10 M12 M16 M20 M24
φ5 15-50 Diameter x 2 4 8
φ6 15-50 5
φ8 15-150 7
φ10 20-350 8
φ12 25-400 10 10
φ15 30-500 13
φ20 40-500 17
φ25 50-600 22
φ30 60-700 27 15
φ35 75-800 30 15
φ40 75-900 36 20
φ50 75-1000 41 20

Back to page top

Accuracy Info

■Accuracy of Post Diameter

Material Surface Treatment Tolerance
1018 Carbon Steel - 0/-0.1
Black Oxide Coating
Electroless Nickel Plating
Trivalent Chromate(Black) ±0.05
304 Stainless Steel - 0/-0.1
2017 Aluminum Alloy Clear Anodize

Back to page top

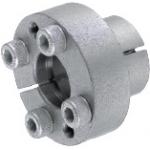
MechaLock

Product name Keyless Bushings - Compact
Part number MLRS30
Features A hub (such as pulleys, gears and sprockets) can be easily connected with a shaft by screwing.
* Orange colored cells in the table below indicate the part numbers used in this example.

Selection criteria

It is suitable for connecting a pipe member for which key groove is not available to a sprocket.

Risk info.

Deformation of pipe due to over-tightening bolt.

Available sizes

■Keyless Bushings - Compact

Body material Surface Treatment
1045 Carbon Steel -
1045 Carbon Steel Electroless Nickel Plating
304 Stainless Steel -

■Sizes and Dimensions

Shaft Hole Dia. Outer Ring O.D.
(pilot)
Inner Ring O.D.
(shoulder)
Shoulder Height Pilot Length.
φ18 φ26 φ46 16 14
φ19 φ27 φ47
φ20 φ28 φ48
φ22 φ32 φ52 16
φ24 φ34 φ54
φ25
φ28 φ39 φ59 20
φ30 φ41 φ61
φ32 φ43 φ63
φ35 φ47 φ67 22
φ38 φ50 φ70
φ40 φ53 φ73
φ42 φ55 φ75
φ45 φ59 φ84 20.5 30
φ48 φ62 φ87
φ50 φ65 φ90

Back to page top

Accuracy Info

■Recommended Tolerance of Applicable Shaft and Hub

Tolerance Finish Surface Roughness
Shaft O.D. h7(g6) Ra1.6 or less
Hub I.D. H7 Ra3.2 or less

Back to page top

Performance info.

■MechaLock Compact Type (With Centering Function)

Shaft Hole Dia. 1045 Carbon Steel/- 1045 Carbon Steel/Electroless Nickel Plating 304 Stainless Steel /-
Max. Allowable
Torque
(N・m)
Allowable
Thrust Load
(kN)
Screw
Tightening Torque
(N・m)
Max. Allowable
Torque
(N・m)
Allowable
Thrust Load
(kN)
Screw
Tightening Torque
(N・m)
Max. Allowable
Torque
(N・m)
Allowable
Thrust Load
(kN)
Screw
Tightening Torque
(N・m)
φ18 210 23.2 14 210 23.2 14 68 7.4 9.6
φ19 221 221 71
φ20 233 233 75
φ22 256 256 83
φ24 279 279 90
φ25 291 291 94
φ28 488 34.8 488 34.8 157 11.1
φ30 523 523 168
φ32 558 558 180
φ35 813 46.4 813 46.4 262 14.9
φ38 883 883 284
φ40 929 929 299
φ42 976 976 314
φ45 1910 84.5 34 1910 84.5 34 620 27.5 23.6
φ48 2040 2040 670
φ50 2120 2120 690

Back to page top

IDEA NOTE Uniform cleaning

The rotary movement of nozzles allow for uniform cleaning of the part.

  • TERMS AND CONDITIONS FOR USE OF CAD DATA
    Your access to the CAD data that MISUMI Corporation (hereinafter referred to as the Company) posts on this site (including 3D CAD data, intermediate 3D CAD data and 2D CAD data; hereinafter referred to as the Data) are of products manufactured and/or sold by the Company (hereinafter referred to as the Products) assumes that you have read and accepted these terms and conditions which govern your use of the Data. If you do not agree to these terms and conditions, you must stop using this website and the Data. You must not use the Data for any unlawful purpose or in any manner inconsistent with these terms and conditions.
    1. CAD Data
    The Data is prepared for assisting the Company's users in the CAD design process by providing dimensions and other Product information. In order to provide the best speed and stability working within this site, the Product drawings were simplified to reduce the size of the Data. For instance, some of the Products are shown without the oil groove shape, screws or spring shape. Also, please be aware that the tolerance, surface roughness and/or chamfer of the Data may vary from the actual Products.
    2. Disclaimer on Data
    While the Company has carefully prepared the Data, accuracy of the Data is not guaranteed and is subject to the variances as described above. The Company may also modify, add or delete the Data at any time without prior notice. The Company assumes no liability for any direct, indirect, consequential or special damages that you may claim resulted from your use of the Data or any changes to or deletions of the Data regardless of the reason. The Company provides no warranty as to the quality, accuracy, functionality, safety or reliability of the combination of Products and parts. Example applications and combinations of the Products are provided for illustrative purposes only.
    3. Copyright
    Copyrights to the content and the Data belong to the Company or the manufacturers of the Products. The said copyright is protected by the Copyright Act and international treaties. The use (including duplication, modification, uploading, posting, transmission, distribution, licensing, sales and publishing) of the Data except for the purpose to use the Data described above without prior approval of the Company is not allowed. The Data cannot be used for any purposes (including sales promotion) except for designing your machine. If you violate this provision or the laws or regulations, the Company may prohibit you from the use of the Data, the Company’s site and/or take legal action. So long as you comply with these terms and conditions, the Company grants to you a non-exclusive, non-transferable, revocable license to access and use the Data for the sole purpose of assisting you in designing machines that incorporate products.
    In case that the CAD data is found to have been to be used for any purpose other than mentioned above or against the related laws, MISUMI may take legal actions, including the one for blocking the involved user from using CAD data and from accessing to the MISUMI site.
    4. Disclaimer of Warranty
    ANY AND ALL CONTENT APPEARING ON THIS WEB SITE IS PROVIDED FOR INFORMATIONAL PURPOSES ONLY. THIS WEB SITE, ITS CONTENT AND ITS LINKS ARE PROVIDED ON AN "AS IS" AND "AS AVAILABLE" BASIS AND ARE USED ONLY AT YOUR SOLE RISK, TO THE FULLEST EXTENT PERMISSIBLE BY LAW. THE COMPANY DISCLAIMS ALL WARRANTIES, EXPRESS OR IMPLIED, OF ANY KIND, REGARDING THIS WEB SITE (INCLUDING ITS CONTENT, HARDWARE, SOFTWARE AND LINKS), INCLUDING AS TO FITNESS FOR A PARTICULAR PURPOSE, MERCHANTABILITY, TITLE, NON INFRINGEMENT, RESULTS, ACCURACY, COMPLETENESS, ACCESSIBILITY, COMPATIBILITY, SECURITY AND FREEDOM FROM COMPUTER VIRUS. THE COMPANY WILL NOT BE LIABLE FOR ANY DAMAGES OR LOSSES, INCLUDING DIRECT, INDIRECT, CONSEQUENTIAL, SPECIAL, INCIDENTAL OR PUNITIVE DAMAGES AND/OR LOST PROFITS, IN CONNECTION WITH USE OF THE INTERNET, THIS WEB SITE, ITS CONTENT OR ITS LINKS
    Further, the Company will not be liable to you for any failure or delay by the Company to provide access to the Data or any of its obligations under these terms and conditions where such failure or delay is the direct or indirect result of any circumstances beyond the Company's reasonable control (and the Company's obligations will be suspended for the duration of such circumstances).

    CAD Download (Unit Assembly)

    CAD Download: File Format
    生成

    Thank you for downloading the data.

    Click the Good IDEA! button when you find interesting design tips.


    This data is utilized in order to list more useful application examples in the future.

    CAD Data Limitations

    1. Assembly data shows the assembly drawings in the concept design phase. The sole purpose of the data is to explain the structure and functionality of the assembly and is not considered nor to be used as a final design.
      You will need to edit the Data so that it meets your specific design conditions.
    2. Unit assembly Data consists of some sub-assemblies.
      It is configured so that each sub-assembly unit can be used as it is or edited.
    3. * The part in the frame is a sub-assembly unit.

    4. The Data for fabricated parts is based on easy-to-edit dimensions and shapes in sketches and histories.
    5. The Data including the third-part components are made by the Company.

    Page top

  • * Unit assembly Data consists of some sub-assemblies.
       It is configured so that each sub-assembly unit can be used as it is or edited.

Application Overview

Purpose

  • Workpiece is cleaned by spraying cleaning solution from a set of rotating arm nozzles where the solution is flowed through the pipe rotating arms.
  • A trap door is equipped for workpiece entry and exit.

Points for use

  • Rotation is driven by belt, pulley, and motor.

Target workpiece

  • Gear
  • Exterior shape: φ120 x H 20mm
  • Workpiece weight: 1kg

Design Specifications

Operating Conditions or Design Requirements

  • External dimension: W 656 x D 300 x H 920mm
    Motor
  • Capacity: 0.1kw
  • Reduction Ratio: 1/40
  • Torque: 19.6 N・m (60Hz)
  • Rotation speed: 45 rpm (60Hz)

Required Performance

  • Weight of rotating arm: 100N
  • Flow rate per nozzle: 6(liter/min)
    (currently, 12liter/min per 2 nozzles)

Selection Criteria for Main Components

  • Motor
    • Motor that generates the required torque to rotate the arm is selected.
  • Nozzle
    • An even fan-shaped nozzle is selected for cleaning evenly.

Design Evaluation

Verification of main components

  • The motor is selected so as to satisfy the load torque.
  • Motor
    • Condition value: Weight of rotating arm: 100N, safety margin ratio: 2, sprocket pitch circle diameter: 101.48mm
    • Load torque of motor T = 1/2 x sprocket pitch circle diameter(m) x weight of rotating arm(N) x safety margin rate, thus,
      T = 1/2 x 0.10148 x 100 x 2 = 10.1N・m < 19.6N・m (rated torque)
      -> Select motor of 0.1kW

Other Design Consideration

  • Select rotating arm that does not interfere with workpiece.
  • Rotation speed is adjusted by adjusting the sprocket sizes.
  • Water is used as the cleaning solution. Adjustment is made by changing pressure using regulator, etc.
  • Door interlock

    A safety system/safety mechanism. It is a mechanism to prevent other actions without fulfilling a certain condition.

    is necessary for the trap door during cleaning.
  • The tank is to be drained at the bottom after cleaning.
  • Using stainless piping due to extensive exposure to potentially corrosive fluids.

Explore Similar Application Examples

Page - / -

Part List

No. Part Name Sample Picture MISUMI Part Number
(click the Part Number below for details)
Quantity
1 Set Screws Flat Type SETS30-300-SC30-M8-N8 4
2 Locating Pins BSP50B20-N-18 1
3 Shaft Collars MSSFS6-10 2
4 Keyless Bushings SFPBA10-P13-L15-B18 1
5 Oil Seals -For Rotation- PSCBSJ30-38 1
6 O Ring MLRS30 1
7 Steel Chains MUDN30 1
8 Adjusting Bolts NGA40 1
9 Adjusting Blocks CHE50-58 1
10 Socket Head Cap Screws-with Washer AJSTS8-50 2
11 Socket Head Cap Screws-with Washer AJKCS8-20 2
12 Single-Axis Robot RSDG1 SCBS8-25 20
13 Linear Shaft SCBS8-35 12
  • The part list above only contains MISUMI parts.
    Part list download (CSV) includes MISUMI and third party components used in this example.
  • TERMS AND CONDITIONS FOR USE OF CAD DATA
    Your access to the CAD data that MISUMI Corporation (hereinafter referred to as the Company) posts on this site (including 3D CAD data, intermediate 3D CAD data and 2D CAD data; hereinafter referred to as the Data) are of products manufactured and/or sold by the Company (hereinafter referred to as the Products) assumes that you have read and accepted these terms and conditions which govern your use of the Data. If you do not agree to these terms and conditions, you must stop using this website and the Data. You must not use the Data for any unlawful purpose or in any manner inconsistent with these terms and conditions.
    1. CAD Data
    The Data is prepared for assisting the Company's users in the CAD design process by providing dimensions and other Product information. In order to provide the best speed and stability working within this site, the Product drawings were simplified to reduce the size of the Data. For instance, some of the Products are shown without the oil groove shape, screws or spring shape. Also, please be aware that the tolerance, surface roughness and/or chamfer of the Data may vary from the actual Products.
    2. Disclaimer on Data
    While the Company has carefully prepared the Data, accuracy of the Data is not guaranteed and is subject to the variances as described above. The Company may also modify, add or delete the Data at any time without prior notice. The Company assumes no liability for any direct, indirect, consequential or special damages that you may claim resulted from your use of the Data or any changes to or deletions of the Data regardless of the reason. The Company provides no warranty as to the quality, accuracy, functionality, safety or reliability of the combination of Products and parts. Example applications and combinations of the Products are provided for illustrative purposes only.
    3. Copyright
    Copyrights to the content and the Data belong to the Company or the manufacturers of the Products. The said copyright is protected by the Copyright Act and international treaties. The use (including duplication, modification, uploading, posting, transmission, distribution, licensing, sales and publishing) of the Data except for the purpose to use the Data described above without prior approval of the Company is not allowed. The Data cannot be used for any purposes (including sales promotion) except for designing your machine. If you violate this provision or the laws or regulations, the Company may prohibit you from the use of the Data, the Company’s site and/or take legal action. So long as you comply with these terms and conditions, the Company grants to you a non-exclusive, non-transferable, revocable license to access and use the Data for the sole purpose of assisting you in designing machines that incorporate products.
    In case that the CAD data is found to have been to be used for any purpose other than mentioned above or against the related laws, MISUMI may take legal actions, including the one for blocking the involved user from using CAD data and from accessing to the MISUMI site.
    4. Disclaimer of Warranty
    ANY AND ALL CONTENT APPEARING ON THIS WEB SITE IS PROVIDED FOR INFORMATIONAL PURPOSES ONLY. THIS WEB SITE, ITS CONTENT AND ITS LINKS ARE PROVIDED ON AN "AS IS" AND "AS AVAILABLE" BASIS AND ARE USED ONLY AT YOUR SOLE RISK, TO THE FULLEST EXTENT PERMISSIBLE BY LAW. THE COMPANY DISCLAIMS ALL WARRANTIES, EXPRESS OR IMPLIED, OF ANY KIND, REGARDING THIS WEB SITE (INCLUDING ITS CONTENT, HARDWARE, SOFTWARE AND LINKS), INCLUDING AS TO FITNESS FOR A PARTICULAR PURPOSE, MERCHANTABILITY, TITLE, NON INFRINGEMENT, RESULTS, ACCURACY, COMPLETENESS, ACCESSIBILITY, COMPATIBILITY, SECURITY AND FREEDOM FROM COMPUTER VIRUS. THE COMPANY WILL NOT BE LIABLE FOR ANY DAMAGES OR LOSSES, INCLUDING DIRECT, INDIRECT, CONSEQUENTIAL, SPECIAL, INCIDENTAL OR PUNITIVE DAMAGES AND/OR LOST PROFITS, IN CONNECTION WITH USE OF THE INTERNET, THIS WEB SITE, ITS CONTENT OR ITS LINKS
    Further, the Company will not be liable to you for any failure or delay by the Company to provide access to the Data or any of its obligations under these terms and conditions where such failure or delay is the direct or indirect result of any circumstances beyond the Company's reasonable control (and the Company's obligations will be suspended for the duration of such circumstances).

    CAD Download (Unit Assembly)

    CAD Download: File Format
    生成

    Thank you for downloading the data.

    Click the Good IDEA! button when you find interesting design tips.


    This data is utilized in order to list more useful application examples in the future.

    CAD Data Limitations

    1. Assembly data shows the assembly drawings in the concept design phase. The sole purpose of the data is to explain the structure and functionality of the assembly and is not considered nor to be used as a final design.
      You will need to edit the Data so that it meets your specific design conditions.
    2. Unit assembly Data consists of some sub-assemblies.
      It is configured so that each sub-assembly unit can be used as it is or edited.
    3. * The part in the frame is a sub-assembly unit.

    4. The Data for fabricated parts is based on easy-to-edit dimensions and shapes in sketches and histories.
    5. The Data including the third-part components are made by the Company.

    Page top

Page top