(!)Due to Microsoft's end of support for Internet Explorer 11 on 15/06/2022, this site does not support the recommended environment.
Instead, please kindly use other browsers like Google Chrome, Microsoft Edge or Mozilla Firefox.

ideanote
inCAD Library

Please read before use

What is inCAD Library?

  • Helpful application examples for mechanical engineers.

The Concept of inCAD Library

  • Online application library with a range of ideas for all manufacturing industries.
  • Save design time and learn new design applications when you are concepting new machines.

Disclaimer

  • MISUMI may not offer all parts in each application design. Available parts can only be purchased separately not as a unit shown in each application design.
  • MISUMI does not guarantee quality, accuracy, functionality, safety or reliability for the combination of the parts in each application example. Accept these points prior to use.
  • 2014 Copyright MISUMI
  • The data cannot be used for any purposes (including sales promotion) except for designing your machine.
  • All associated CAD is free. Misumi reserves the right at its sole discretion to cancel, terminate or modify this offer.
  • MISUMI may change, add or delete application examples posted without prior notice.
  • MISUMI assumes no responsibilities for any damage incurred resulting from your use of the Service or any change, addition or deletion by MISUMI of the application examples for any reason whatsoever.

inCAD Library Features

  1. Get great new design ideas for these application examples.
  2. Over 300 design application ideas
    collected from dozens of industries!

  3. Find application examples quickly! Search by function, workpiece shape, etc.

  4. Download the CAD models for each application example.
  5. Log in to download free CAD models.
    Download CAD for the entire application example!

Good IDEA! button

Click the Good IDEA! Button when you like an application example!

*Can only be clicked once per application example.

  • Upper right corner on the page of application example details

  • Pop-up dialog for CAD data downloading

Page top

Keyword Search
No. Search

No.000180 Mechanism to Check Part Condition

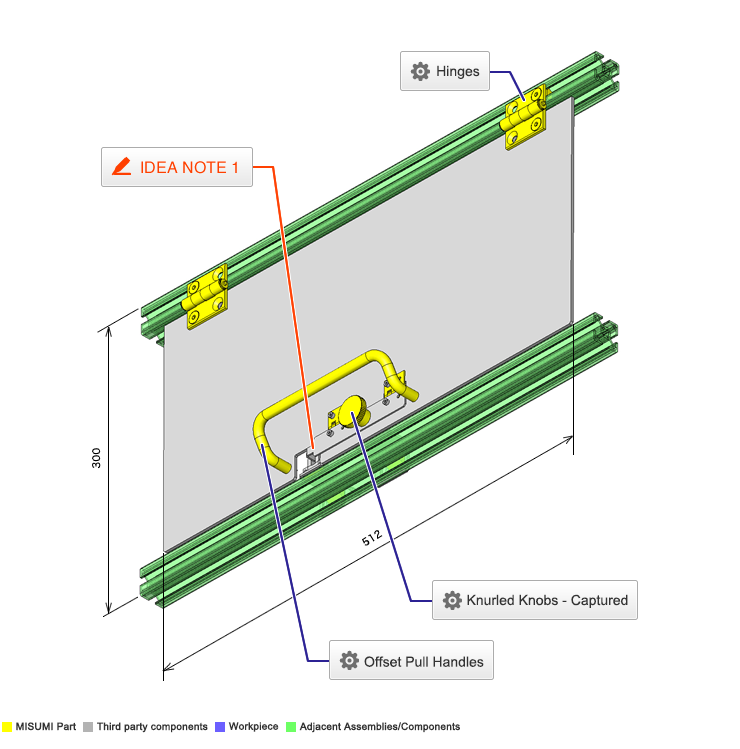
Sensor position adjustments using a spring hinge.

Knurled Knobs - Captured

Product name Knurled Knobs - Drop-Proof
Part number NKOSD8-20
* Orange colored cells in the table below indicate the part numbers used in this example.

Selection criteria

Select Drop-proof type to prevent losing knobs when the door opens

Back to page top

Available sizes

■Knurled Knobs - Drop-Proof

Material Surface Treatment
1212 Carbon Steel Buff Polished + Chrome Plating
303 Stainless Steel Brushed Finish

■Sizes and Dimensions

Thread Knob Shaft Part under Head Stepped Shaft Part Mounting
Height
Length under
head
DIA. (Coarse) Length O.D. Thickness Diameter Length Diameter Length
M3 4 φ12 2.5 φ6 6 φ5 2 7.5 10
M4 5 φ16 3.5 φ8 5 φ6 3 9.5 10
10 15
M5 6 φ20 4 φ10 4 φ7.5 3.8 11.5 10
9 15
14 20
M6 8 φ24 5 φ12 7 φ10 4.5 15 15
12 20
22 30
M8 10 φ30 6 φ16 10 φ12 6 18 20
20 30

Back to page top

Offset Pull Handles

Product name Handles - Offset
Part number UHFNEA160
Features Round Bar Pull Handles - Offset
* Orange colored cells in the table below indicate the part numbers used in this example.

Selection criteria

Suitable as an economical way to open and close the door.

Back to page top

Available sizes

■Handles - Offset

Material Surface Treatment
1018 Carbon Steel Chrome Plating
304 Stainless Steel Buffing
Aluminum Alloy
Anodize (Clear)
Electrostatic Paint (Mat Black)

■Sizes and Dimensions

Rod Dia. Overall Length Mounting Pitch Mounting Screw Hole Overall Height Overall Width Allowable Load (N)
φ10 58 48 M5 (Coarse)
Depth 13
47 40 2000
76 66
98 88
110 100
120 110
130 120
135 125
170 160

Back to page top

Hinges

Product name Aluminum Hinges
Part number HHPBSN6
* Orange colored cells in the table below indicate the part numbers used in this example.

Selection criteria

Suitable to open and close the mechanism.

Back to page top

Available sizes

■Aluminum Hinges

Material Surface Treatment
304 Stainless Steel Gloss Tumble Polish

■Sizes and Dimensions

Length Applicable Mounting Screw Dia. Holes on One Side Overall Width Plate Thickness
20 - - 14 0.5
25 M3 2 32 1.2
38 32 1.5
51 38 1.5

Back to page top

Performance info.

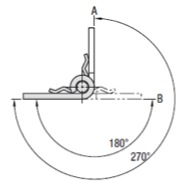
■Spring Load of Spring Hinges

Length Spring Load
(kgf)
20 0.38
25 0.4
38 1
51 0.68

*Spring load is a value at (A) with the hinge plates folded at 270° as shown in the figure.
Only for Length 20, the value is measured at a 180° angle position (B).
Do not bend Length 20 beyond 180° angle position (B).
Small wire diameter spring may cause problems.

Back to page top

IDEA NOTE Prevent failure when closing or affixing maintenance door

As the dog for the open and close check is flipped by the spring, it is not possible to shield the sensor from light unless the door is fixed.

  • TERMS AND CONDITIONS FOR USE OF CAD DATA
    Your access to the CAD data that MISUMI Corporation (hereinafter referred to as the Company) posts on this site (including 3D CAD data, intermediate 3D CAD data and 2D CAD data; hereinafter referred to as the Data) are of products manufactured and/or sold by the Company (hereinafter referred to as the Products) assumes that you have read and accepted these terms and conditions which govern your use of the Data. If you do not agree to these terms and conditions, you must stop using this website and the Data. You must not use the Data for any unlawful purpose or in any manner inconsistent with these terms and conditions.
    1. CAD Data
    The Data is prepared for assisting the Company's users in the CAD design process by providing dimensions and other Product information. In order to provide the best speed and stability working within this site, the Product drawings were simplified to reduce the size of the Data. For instance, some of the Products are shown without the oil groove shape, screws or spring shape. Also, please be aware that the tolerance, surface roughness and/or chamfer of the Data may vary from the actual Products.
    2. Disclaimer on Data
    While the Company has carefully prepared the Data, accuracy of the Data is not guaranteed and is subject to the variances as described above. The Company may also modify, add or delete the Data at any time without prior notice. The Company assumes no liability for any direct, indirect, consequential or special damages that you may claim resulted from your use of the Data or any changes to or deletions of the Data regardless of the reason. The Company provides no warranty as to the quality, accuracy, functionality, safety or reliability of the combination of Products and parts. Example applications and combinations of the Products are provided for illustrative purposes only.
    3. Copyright
    Copyrights to the content and the Data belong to the Company or the manufacturers of the Products. The said copyright is protected by the Copyright Act and international treaties. The use (including duplication, modification, uploading, posting, transmission, distribution, licensing, sales and publishing) of the Data except for the purpose to use the Data described above without prior approval of the Company is not allowed. The Data cannot be used for any purposes (including sales promotion) except for designing your machine. If you violate this provision or the laws or regulations, the Company may prohibit you from the use of the Data, the Company’s site and/or take legal action. So long as you comply with these terms and conditions, the Company grants to you a non-exclusive, non-transferable, revocable license to access and use the Data for the sole purpose of assisting you in designing machines that incorporate products.
    In case that the CAD data is found to have been to be used for any purpose other than mentioned above or against the related laws, MISUMI may take legal actions, including the one for blocking the involved user from using CAD data and from accessing to the MISUMI site.
    4. Disclaimer of Warranty
    ANY AND ALL CONTENT APPEARING ON THIS WEB SITE IS PROVIDED FOR INFORMATIONAL PURPOSES ONLY. THIS WEB SITE, ITS CONTENT AND ITS LINKS ARE PROVIDED ON AN "AS IS" AND "AS AVAILABLE" BASIS AND ARE USED ONLY AT YOUR SOLE RISK, TO THE FULLEST EXTENT PERMISSIBLE BY LAW. THE COMPANY DISCLAIMS ALL WARRANTIES, EXPRESS OR IMPLIED, OF ANY KIND, REGARDING THIS WEB SITE (INCLUDING ITS CONTENT, HARDWARE, SOFTWARE AND LINKS), INCLUDING AS TO FITNESS FOR A PARTICULAR PURPOSE, MERCHANTABILITY, TITLE, NON INFRINGEMENT, RESULTS, ACCURACY, COMPLETENESS, ACCESSIBILITY, COMPATIBILITY, SECURITY AND FREEDOM FROM COMPUTER VIRUS. THE COMPANY WILL NOT BE LIABLE FOR ANY DAMAGES OR LOSSES, INCLUDING DIRECT, INDIRECT, CONSEQUENTIAL, SPECIAL, INCIDENTAL OR PUNITIVE DAMAGES AND/OR LOST PROFITS, IN CONNECTION WITH USE OF THE INTERNET, THIS WEB SITE, ITS CONTENT OR ITS LINKS
    Further, the Company will not be liable to you for any failure or delay by the Company to provide access to the Data or any of its obligations under these terms and conditions where such failure or delay is the direct or indirect result of any circumstances beyond the Company's reasonable control (and the Company's obligations will be suspended for the duration of such circumstances).

    CAD Download (Unit Assembly)

    CAD Download: File Format
    生成

    Thank you for downloading the data.

    Click the Good IDEA! button when you find interesting design tips.


    This data is utilized in order to list more useful application examples in the future.

    CAD Data Limitations

    1. Assembly data shows the assembly drawings in the concept design phase. The sole purpose of the data is to explain the structure and functionality of the assembly and is not considered nor to be used as a final design.
      You will need to edit the Data so that it meets your specific design conditions.
    2. Unit assembly Data consists of some sub-assemblies.
      It is configured so that each sub-assembly unit can be used as it is or edited.
    3. * The part in the frame is a sub-assembly unit.

    4. The Data for fabricated parts is based on easy-to-edit dimensions and shapes in sketches and histories.
    5. The Data including the third-part components are made by the Company.

    Page top

  • * Unit assembly Data consists of some sub-assemblies.
       It is configured so that each sub-assembly unit can be used as it is or edited.

Application Overview

Purpose

  • Purpose
    • Prevents failure when closing or affixing the maintenance door.
  • Operation
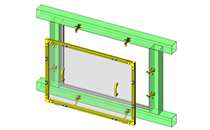
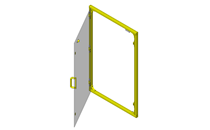
    • After closing the door, fix the bracket connected to the door with the spring hinge using the knurled knob. At this point, the bracket shields the sensor from light. By removing the knurled knob, the bracket and knob are flipped up, tripping the check sensor.

Points for use

  • Manually operated.

Target workpiece

  • Doors that require interlock

    A mechanism, used as a safety mechanism, that disables other operations when predetermined conditions are not satisfied.

    .

Design Specifications

Selection Criteria for Main Components

  • Spring hinges that can be flipped up against the weight of the knob.

Design Evaluation

Verification of main components

  • The spring hinges are verified based on the load moment, to see whether the dog moves away from the sensor.
    • Conditional Value:
      Total mass of dog and knob: m = 0.10kg
      Horizontal distance between hinge shaft and center of gravity of dog and knob: a 20.0mm
      Load of hinge spring: k = 0.40kgf
      Hinge spring load definition angle: θ = 270°
      Hinge spring load position: b = 16mm
      Number of hinge springs: n = 2pieces
      Hinge spring load in free condition: k0 = 0.10kgf
      Hinge spring angle in free condition: θ0=90°
      Target hinge angle: θ1 = 225°
      Gravitational acceleration: g = 9.8m/s2

      Hinge spring load at target angle: k1 = {(k - k0)/(θ - θ0)} x θ1 = {(0.4 - 0.1)/(270 - 90)} x 225 = 0.375kgf
      Total hinge spring load at target angle: k1' = k1 x n = 0.375 x 2 = 0.75kgf

      Moment by dog and knob: M1=m x g x a, hence, M1 = 0.1 x 9.8 x 20 = 2.0kgf・mm
      Moment by hinge: M2 = k1' x b, hence, M2 = 0.75 x 16 = 12.0kgf・mm
      From M1 < M2, the angle of the hinge at an unfixed state satisfies the target angle θ1 at which the dog moves away from the sensor.

Other Design Consideration

  • The mechanism is designed so that when flipped up, the spring hinge flips the total weight of the dog away from the sensor.
  • The photomicrosensor should be set to turn on when shielded from light, and the interlock

    A mechanism, used as a safety mechanism, that disables other operations when predetermined conditions are not satisfied.

    should be applied when the sensor turns off due to the door being open or failure of the sensor.

Explore Similar Application Examples

Page - / -

Part List

No. Part Name Sample Picture MISUMI Part Number
(click the Part Number below for details)
Quantity
1 Aluminum Hinges HHSP25 2
2 Nuts For Aluminum Extrusion NKOSD8-20 1
3 Nuts for Aluminum Extrusion SQNS3-25-19 1
4 Flat Head Cap Screws UHFNEA160 1
5 Needle Bearing HHPBSN6 2
6 Rotary Shaft HNTASS6-6 6
7 Bearing Lock Nuts HNTASN6-4 2
8 Ball Bearing SFB6-12 8
  • The part list above only contains MISUMI parts.
    Part list download (CSV) includes MISUMI and third party components used in this example.
  • TERMS AND CONDITIONS FOR USE OF CAD DATA
    Your access to the CAD data that MISUMI Corporation (hereinafter referred to as the Company) posts on this site (including 3D CAD data, intermediate 3D CAD data and 2D CAD data; hereinafter referred to as the Data) are of products manufactured and/or sold by the Company (hereinafter referred to as the Products) assumes that you have read and accepted these terms and conditions which govern your use of the Data. If you do not agree to these terms and conditions, you must stop using this website and the Data. You must not use the Data for any unlawful purpose or in any manner inconsistent with these terms and conditions.
    1. CAD Data
    The Data is prepared for assisting the Company's users in the CAD design process by providing dimensions and other Product information. In order to provide the best speed and stability working within this site, the Product drawings were simplified to reduce the size of the Data. For instance, some of the Products are shown without the oil groove shape, screws or spring shape. Also, please be aware that the tolerance, surface roughness and/or chamfer of the Data may vary from the actual Products.
    2. Disclaimer on Data
    While the Company has carefully prepared the Data, accuracy of the Data is not guaranteed and is subject to the variances as described above. The Company may also modify, add or delete the Data at any time without prior notice. The Company assumes no liability for any direct, indirect, consequential or special damages that you may claim resulted from your use of the Data or any changes to or deletions of the Data regardless of the reason. The Company provides no warranty as to the quality, accuracy, functionality, safety or reliability of the combination of Products and parts. Example applications and combinations of the Products are provided for illustrative purposes only.
    3. Copyright
    Copyrights to the content and the Data belong to the Company or the manufacturers of the Products. The said copyright is protected by the Copyright Act and international treaties. The use (including duplication, modification, uploading, posting, transmission, distribution, licensing, sales and publishing) of the Data except for the purpose to use the Data described above without prior approval of the Company is not allowed. The Data cannot be used for any purposes (including sales promotion) except for designing your machine. If you violate this provision or the laws or regulations, the Company may prohibit you from the use of the Data, the Company’s site and/or take legal action. So long as you comply with these terms and conditions, the Company grants to you a non-exclusive, non-transferable, revocable license to access and use the Data for the sole purpose of assisting you in designing machines that incorporate products.
    In case that the CAD data is found to have been to be used for any purpose other than mentioned above or against the related laws, MISUMI may take legal actions, including the one for blocking the involved user from using CAD data and from accessing to the MISUMI site.
    4. Disclaimer of Warranty
    ANY AND ALL CONTENT APPEARING ON THIS WEB SITE IS PROVIDED FOR INFORMATIONAL PURPOSES ONLY. THIS WEB SITE, ITS CONTENT AND ITS LINKS ARE PROVIDED ON AN "AS IS" AND "AS AVAILABLE" BASIS AND ARE USED ONLY AT YOUR SOLE RISK, TO THE FULLEST EXTENT PERMISSIBLE BY LAW. THE COMPANY DISCLAIMS ALL WARRANTIES, EXPRESS OR IMPLIED, OF ANY KIND, REGARDING THIS WEB SITE (INCLUDING ITS CONTENT, HARDWARE, SOFTWARE AND LINKS), INCLUDING AS TO FITNESS FOR A PARTICULAR PURPOSE, MERCHANTABILITY, TITLE, NON INFRINGEMENT, RESULTS, ACCURACY, COMPLETENESS, ACCESSIBILITY, COMPATIBILITY, SECURITY AND FREEDOM FROM COMPUTER VIRUS. THE COMPANY WILL NOT BE LIABLE FOR ANY DAMAGES OR LOSSES, INCLUDING DIRECT, INDIRECT, CONSEQUENTIAL, SPECIAL, INCIDENTAL OR PUNITIVE DAMAGES AND/OR LOST PROFITS, IN CONNECTION WITH USE OF THE INTERNET, THIS WEB SITE, ITS CONTENT OR ITS LINKS
    Further, the Company will not be liable to you for any failure or delay by the Company to provide access to the Data or any of its obligations under these terms and conditions where such failure or delay is the direct or indirect result of any circumstances beyond the Company's reasonable control (and the Company's obligations will be suspended for the duration of such circumstances).

    CAD Download (Unit Assembly)

    CAD Download: File Format
    生成

    Thank you for downloading the data.

    Click the Good IDEA! button when you find interesting design tips.


    This data is utilized in order to list more useful application examples in the future.

    CAD Data Limitations

    1. Assembly data shows the assembly drawings in the concept design phase. The sole purpose of the data is to explain the structure and functionality of the assembly and is not considered nor to be used as a final design.
      You will need to edit the Data so that it meets your specific design conditions.
    2. Unit assembly Data consists of some sub-assemblies.
      It is configured so that each sub-assembly unit can be used as it is or edited.
    3. * The part in the frame is a sub-assembly unit.

    4. The Data for fabricated parts is based on easy-to-edit dimensions and shapes in sketches and histories.
    5. The Data including the third-part components are made by the Company.

    Page top

Page top